

Making it FUN and EASY to use
CoolSoft, LLC SPEECH with your COMPUTER!
Quick
Start Guide for Speak-to-Mail™ 1.0
Version
1.00.23
INTRODUCTION
Speak-to-Mail™ is a simple, low-cost email program that is fun and easy to use. It lets you send email by speech using your favorite email program and state of the art speech recognition technology from Microsoft Corporation. Now, with Speak-to-Mail™, you can send emails simply by speaking to your computer. Speak-to-Mail™ works by providing an interface as a template for your email, and includes your contact list. You can address, compose and send your email entirely by speech. When you send your message, Speak-to-Mail™ populates the fields of a message in your default email program and sends the message according to the email program’s settings.
Note: CoolSoft,
LLC acquired the rights to Speak-to-Mail 1.0 and other assets of Yellow Tiger, LLC
in December 2003. CoolSoft is
re-releasing Speak-to-Mail™ Version 1.00. 23.
There are some important differences between Version 1.00.23 and the
former version 1.00.22 previously released by Yellow Tiger
.
· The full version of Speak-to-Mail 1.00.23 no longer requires a registration key, and can be obtained only by purchasing a license from www.coolsoftllc.com.
· Speak-to-Mail™ now comes in a single install that includes the speech engine and lets you choose which edition you want to install. There are three editions for Outlook Express, Outlook and Netscape 7.x.
· Editions for Netscape 4.x, 6.x, Eudora and AOL have been discontinued.
· Bug fixes to some known issues identified in version 1.00.22 have been made.
· SpeakPad™ has been discontinued, and replaced by SpeakToText™ 2.0, a more robust and feature packed speech program, which can be purchased at www.coolsoftllc.com.
· Support for version 1.00.22 and all previous versions has been discontinued.
· The trial version of Speak-to-Mail™ remains at version 1.00.22. It does not include speech recognition, and to use the trial version you must already have Microsoft SAPI speech recognition installed on your computer.
· The trial version of Speak-to-Mail™ will run only for 60 days and registration keys to upgrade the trial version to the full version are no longer available. To run the full version of Speak-to-Mail™, the trial version must be uninstalled.
· The
install of the full version gives you the option to uninstall of the trial
version before continuing with the install.
Table of Contents
Checking
for the SAPI Speech Recognition Engine.
Setting
Up the Microsoft SAPI 5.1 Speech Recognition Engine
Tips
For Achieving the Best Possible Speech Recognition
Setting
the Correct Default Email Program
SpeakPad™ and
the SpeakPad™ Button
3. Natural Language Modeling Technology
GETTING STARTED
System Requirements
System requirements for Speak-to-Mail™ are:
|
Operating System: |
Windows 98se, Me, 2000
or XP (Home or Professional) |
|
Memory: |
At least 128 Meg RAM,
256 or better preferred. |
|
System Processor: |
A PC with a 500mhz or
greater Pentium III, Pentium IV or Pentium compatible processor. |
|
Disk Space: |
100 megs free disk
space |
|
Software: |
Microsoft SAPI 5.1
Speech Recognition Engine* At least one of the following email programs:
Outlook, Outlook Express or Netscape 7.x |
|
Hardware: |
A good quality,
noise-cancellation microphone. A good quality, SoundBlaster compatible sound
card |
|
User: |
About 15 to 30 minutes
of your time to install Speak-to-Mail™, install the redistribution of the
Microsoft SAPI 5.1 speech recognition engine, and train your recognition
profile to recognize your voice. |
*Available
by redistribution with Speak-to-Mail™ or directly from Microsoft.
Note that the trial version does not include the SAPI Speech Engine.
Checking for the SAPI Speech Recognition Engine
You
need to have the Microsoft SAPI compliant speech recognition engine installed
on your computer. If you have not
previously installed the SAPI speech recognition engine either directly from
Microsoft or in conjunction with another SAPI 5.1 speech recognition program,
the full version of Speak-to-Mail™ will install it for you. However, you will not be able to use speech
with the trial version if you do not already have SAPI installed.
(Step 1) -- Check if you have the Microsoft speech recognition engine:
1.
Open the
control panel (StartàSettingsàControl Panel). Look for the
Speech icon shown 
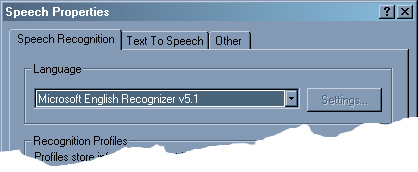
2.
If you see the
speech icon, double click on it and you will see the Speech Properties dialog
box.
Note: If the Speech icon is not present,
then you do not have the speech recognition engine on your computer and you can
skip the rest of this section
(Step 2) -- Check the
version of the Microsoft speech recognition engine:
Setting Up the Microsoft SAPI 5.1 Speech Recognition Engine
Start “Speech Properties”
 Go to the
control panel (StartàSettingsàControl Panel).
Find and double click the “Speech” icon
Go to the
control panel (StartàSettingsàControl Panel).
Find and double click the “Speech” icon

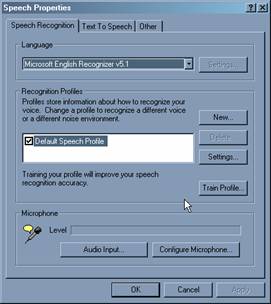
The “Speech Properties” dialog box will appear.
Setup
your Recognition Profile
You
can use the “Default Speech Profile,” but we recommend you create a speech
profile.
When
have completed creating your new profile click “Next” to configure your
microphone and train your profile (do not click “finish”). The next two
sections are extremely important in achieving good speech recognition and the
highest possible level of accuracy.
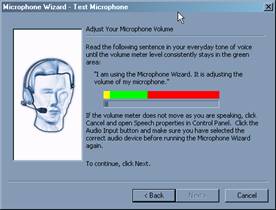 Configure your Microphone
You
should establish a habit of configuring your microphone in the same way each
time you start a speech recognition session. Use the “Configure Microphone”
button on in “Speech Properties” as often as you need.
Microphone quality: To achieve good speech recognition, you need to have a good quality noise canceling microphone. We recommend a headset type microphone.
Train the Microsoft SAPI 5.1 Speech Recognition
Engine
Training Overview
The
Microsoft Speech Recognition Engine needs a sample of each users
speech to correctly convert sound into written words. Each speaker and each
computer audio system have unique characteristics, which must be sampled and
used to adjust the engine. This process is called “training” the engine. Each
user must train their own profile.
Training
To
start training click on the “Train Profile” button from the Speech Recognition
tab and follow the instructions.
IMPORTANT: To keep improving your accuracy, you should come back to the Speech Properties and do additional training. The more you train and use the speech engine, the more your accuracy will improve. In testing, we found a substantial improvement in accuracy between the second and third training. After five sessions, the accuracy was much greater. We suggest you take advantage of the opportunity to read all of the available selections to your computer.
Text To Speech Tab
The
“Text To Speech” tab in the Speech Properties dialog box is where you can
select the computer’s output voice.
Voice Selection
Use
the drop-down list under “Voice Selection” to choose a voice, and you will hear
the selected voice read a sample sentence.
Tips For Achieving the Best Possible Speech Recognition
Here are some tips on getting the best possible speech recognition:
Microphone
– Using a high quality,
noise-canceling microphone is very important.
Making sure your microphone is setup properly in the Speech Properties
is essential. Make
certain your microphone position is consistent both in training and in use.
Training - Training the engine to recognize your voice at least several times when you first start using it will greatly improve your recognition.
Training
Words – If you consistently get incorrect
recognition of certain words, using the “Train Word” function in Speak-to-Mail™
will greatly enhance recognition of those words.
Use - The more
you use speech with your computer, the more your recognition will improve.
Environment - Being in a quiet room helps.
Hardware -
Having a faster processor
and ample memory and a high quality, SoundBlaster compatible, audio input is
also important.
Commitment
- We cannot over emphasize the
importance of training your recognition profile several times.
Speak
clearly - When using Speak-to-Mail™,
speak clearly and into the microphone.
USING SPEAK-TO-MAIL™
Setting the Correct Default Email Program
 In order for
Speak-to-Mail™ to function properly, the email program and address book for the
edition of Speak-to-Mail™ that you are using must be set as the default email
program, or said differently, you need to use the edition of Speak-to-Mail that
corresponds with your default email program.
In order for
Speak-to-Mail™ to function properly, the email program and address book for the
edition of Speak-to-Mail™ that you are using must be set as the default email
program, or said differently, you need to use the edition of Speak-to-Mail that
corresponds with your default email program.
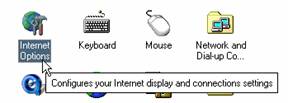
Go to Internet Options in the Control Panel: (Start, à Settings, à Control Panel). Select the correct email program and address book for the edition of Speak-to-Mail™ you are using.
Starting Speak-to-Mail™
To
start Speak-to-Mail™, either click the Speak-to-Mail™ icon on your desktop, or
use the program menu (Startà Programsà Speak-to-Mailà “Speak-to-Mail™ for (Edition)”.
Note: The trial version of Speak-to-Mail™ is version 1.00.22, and will
display the startup splash screen, which enables a 60-day trial period. The trial version cannot be registered or
upgraded to the full version, and must be uninstalled before you can install
the full version 1.00.23. When you
purchase the full version of Speak-to-Mail™, the install will give you the
option to uninstall the trial version before continuing. Aside from these differences and some bug
fixes, the trial version 1.00.22 and the full version 1.00.23 are substantially
the same.
Starting the Default Email Program
If
you are using the Outlook or Outlook Express edition, as Speak-to-Mail™ is
opening; it will also open the email program for that edition of
Speak-to-Mail™.
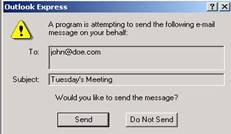
In
the Netscape 7.x edition, the Speak-to-Mail™ opens the messenger and a compose
window when you send an email. The email
can be sent now or later from Netscape.
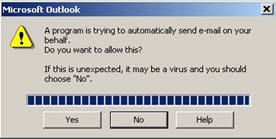
If
you are using Outlook and have the latest Windows security updates, the
Microsoft security service dialog box will appear.
Check
the box labeled “Allow access for,” use the default of
“1 minute” and click on “Yes”. This will
allow Speak-to-Mail™ to access the address book and read your contact list.
IMPORTANT: If you do not see the dialog box shown you either do not have the latest Microsoft security updates and the program will continue loading, or the security dialog box is minimized in the toolbar at the bottom of your desktop.
Sending Your Email
To
send your email, say “Click Send Email” and Speak-to-Mail™ will send your email
according to the following:
Outlook and Outlook Express
The
email is sent directly to the program where it is sent according to the default
settings.
Netscape 7.x Edition
Speak-to-Mail™
opens messenger and a compose window.
You can choose to send your email from Netscape now or send it later.
Windows Security Updates
If
you are using Microsoft Outlook 2000, XP or 2003, or Microsoft Outlook Express
from an installation of Windows 2000 or XP, and if you have the latest Windows
security updates, the Microsoft security service dialog box will appear.
Important Notes
THERE ARE A NUMBER OF IMPORTANT ITEMS TO NOTE BEFORE YOU START
All the names in your address book must be unique.
If
Speak-to-Mail™ finds more than one entry for a name when it is reading your
address book, it will load only the first occurrence of that name.
The names in your address book must contain letters only.
Speak-to-Mail™
cannot recognize contact names that contain characters other than letters. When Speak-to-Mail™ loads your contact list
it removes all extra characters and displays only the letters.
Sending Email
To
send an email, Speak-to-Mail™ must have at least one recipient in the “TO”
field and the “Subject” line must contain some text. Otherwise, you will not be able to send your
message. Please review the section on “Email Security” in the User Manual.
SpeakPad™ and the SpeakPad™ Button
SpeakPad™ was discontinued when CoolSoft, LLC acquired the assets of Yellow Tiger, LLC, the creator of Speak-to-Mail™ and SpeakPad™. SpeakPad™ has been replaced by SpeakToText™ 2.0.
SpeakToText™ 2.0 is a much more robust and feature packed speech recognition program. You can learn more about SpeakToText™ 2.0 and get your copy by going to:
www.coolsoftllc.com/main.asp?product=9
The
SpeakPad™ button in Speak-to-Mail™ opens a dialog that will take you to our
website where you can get your license and copy of SpeakToText™ 2.0.
Speech Recognition Reference
Speak-to-Mail™
uses three speech modes:
1. Command & Control
Command
& Control is used to navigate the fields and perform functions. Some of the spoken commands also activate the
functions of buttons on the screen and place email addresses in desired
fields. Other commands within dictation
do not have buttons. See the commands
list at the end of this guide.
2. Dictation
Dictation
is used to freely dictate your email subject and text message.
3. Natural Language Modeling Technology
The Nature Language Model is designed to allow you to interact more naturally with the program. For example – this dialog:
You: “Computer”
Computer: “Yes”
You: “Send an email to John Doe about next Tuesday’s meeting.”
Will result in:
John
Doe’s email address will appear in the “TO” field, the “Subject” field will
read “Next Tuesday’s meeting,” and the cursor will be placed in the “Body”
ready to accept your dictation of the message.
To
get the most out of using our Natural Language Model, we recommend that you
read the Natural Language Model section in the Speak-to-Mail™ User Guide.
Buttons
Three
different styles of buttons are used in the interface screens:
YELLOW - The buttons with yellow text are where you email addresses and text are entered and activated by speech commands (i.e. “select (NAME)” to place a contact’s name in the “To:” field.) They do not perform any task when you click on them.
GREEN - The buttons with green text are function buttons that can be activated both by speech commands and by mouse clicks.
GRAY - Gray buttons, like the buttons typically used in Windows applications, are used in Speak-to-Mail™ sub-screens where speech recognition is not active. A gray button indicates that speech recognition will not work with that button, and that you must use your mouse to click on it.
Tool Tips
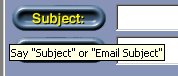 To help you
with commands, “Tool Tips” are included with each button that is speech
enabled. When place the arrow over a
button it will tell you what you can say to activate the command function for
that button.
To help you
with commands, “Tool Tips” are included with each button that is speech
enabled. When place the arrow over a
button it will tell you what you can say to activate the command function for
that button.
Using the Mouse and Keyboard
If
you are having trouble with recognition, or do not have your microphone handy,
you can use the mouse and keyboard to send an email with Speak-to-Mail™. Use
the mouse to navigate to the fields and to click buttons on the Speak-to-Mail™
screen.
In
the “Subject” or “Body” fields, you can use the mouse to highlight the desired
text, and then you can use either voice commands or the right mouse button to
cut, copy or paste text.
Remember, if you are cutting or copying text, your selection must be highlighted first. To paste text, you must use the mouse to place the cursor in the location where you want to paste the text.
IMPORTANT: If you type or say something (other than a voice command) while text is highlighted, the text will be replaced by what you typed or said, and you will not be able to recover the deleted text.
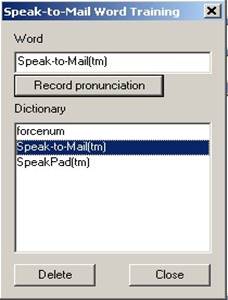 Training Words
To
train a word, you must be in Speak-to-Mail™, say, “click train word” or click
on the “train word” button with your mouse, and the Train Word dialog box will
open.
Type in the correct spelling of the word you want to train in the “Word” box, then click on the “Record pronunciation” button and say the word to add it to the custom dictionary in your speech recognition profile. Trained words are saved only in your speech recognition profile, and are not available to other users.
Command Summary
Microphone Commands
To turn on the microphone, say
“Wake Up” or “Microphone On”.
To turn off the microphone, say
“Go to Sleep” or “Microphone Off”.
You can also click on the
microphone icon to turn the microphone on and off.
Screen Navigation
To move the cursor to a field:
Desired Field Commands
(what to say)
To “To”
CC “CC” “Copy”
BCC “BCC” “Blind” “Blind Copy”
Subject “Subject” “Email
Subject”
Body “Body”
“Text Message” “Text” “Email Text” “Email Body” “Email Message”
Placing a Contact’s Email Address in an Address Field
Desired Field What
to Say
To “Select NAME” “Send to
NAME”
CC “Copy to NAME” “Copy
NAME”
BCC “Blind to NAME” “Blind Copy NAME”
When you see the dialog box, to
select the name you want, say, “choose (number next to the contact’s
name).” For example, say, “choose one”
to select the first name in the list.
You can also choose the desired contact with a left mouse click.
Clearing Fields
Desired Field Commands
(what to say)
To “Clear To” “Clear Send To”
CC “Clear CC” “Clear Copy”
“Clear Copy To”
BCC “Clear BCC” “Clear Blind”
“Clear Blind Copy” “Clear Blind
Copy
To”
Subject “Clear Subject”
Attachment “Clear Attachment”
Selected Text “Delete Selection”
Body “Clear Text” “Clear Message” “Clear Body”
Entire Message “Clear Email”
“Clear All”
Sorting Contacts
You
can alternate sorting between first and last name simply by saying, “click
sort.” You can also use your mouse to
click on the “Sort Contacts by First/Last Name” button.
If
contacts are sorted by first name, you have to say “select John Doe.”
If contacts are sorted by last name, you have to say, “select Doe John.”
Scrolling Up and Down the Contact List
To
scroll down the contact list, say “contacts page down.”
To scroll up the contact list, say “contacts page up.”
Finding a Contact’s Phone Number
To
retrieve a contact’s phone number you say “Phone Number (the contact’s
name).”
Attachments
To
open the Attachment Window, say “Click Attachment.”
Sending Your Email
To
send your email, say “Click Send Email” and Speak-to-Mail™ will send your email
according to the following:
Closing Speak-to-Mail™
To
close Speak-to-Mail™, say “Click Close,” or click on the “Close” button.
Open Signature dialog box
To
open the signature dialog box say, “click Update Signature” or click on the
“Update Signature” button. To disable/enable/change the Startup Greeting or
disable/enable the banner from the signature settings dialog box.
Embedding a Signature File in Your Emails
Speak-to-Mail™
lets you embed a text signature at the end of each email. You can do this globally for all of your
emails, or with individual emails. Before you can embed a signature in your
email, you must first setup a signature file.
To do this, say “click update signature” (or click on the “Update
Signature” button) and the Settings screen will open.
Note: Speech recognition is not active in this dialog box. Use the keyboard to enter your signature file as you would like it to appear and click on “Save.”
Dictation Commands
The following sections
contain a list of dictation commands.
The Cursor Has Disappeared
If
it appears that you have lost the cursor even though Speak-to-Mail™ is still
accepting dictation, you can say the command “free cheese” to bring back the
cursor.
Selecting Sentences and Paragraphs
Command – What To Say: RESULT:
“select last sentence” the
text up to the last period “.” will be highlighted.
“select last paragraph” the
last paragraph will be highlighted.
“select all,” all
the text in your message will be highlighted.
“delete selection,” the selected text will be deleted
Cut, Copy
and Paste Commands:
Command – What To Say: RESULT:
“copy to clipboard” copies
the selected text to the clipboard.
“cut to clipboard.” copies
selected text to the clipboard & clears the text.
“paste from clipboard” pastes text from the clipboard at the cursor location.
Correcting Text
Command – What To Say: RESULT:
“scratch that,” or “no no.” delete the last word in the text.
“scratch last” erase the last string of text that was recognized.
Moving Within Dictated Text
Command – What To Say: RESULT:
Go to Bottom move
the cursor to the end of your document.
Go to Top move the cursor to the beginning of your document.
Formatting Text
Command – What To Say: RESULT:
New Paragraph Presses
enter key twice.
New Line Presses enter key once.
Backspace Presses
the backspace key once.
Space Bar Presses space bar once.
Cap Text Capitalize the first letter of each word in the
selected (highlighted) text.
Cap All
Text Capitalize all the letters the selected
(highlighted) text.
Bold Text Bolds the selected (highlighted) text.
Italicize Text Italicizes the selected (highlighted) text.
Underline Text Underlines the selected (highlighted) text.
Numbers and Fractions
Number: What To Say:
Three three
(the speech engine default for single numerals between zero and twenty typed as
text.
“3” Forcenum
three – will return the numeral 3.
Note: You may need to train the
speech engine to recognize your pronunciation of “forcenum.”
“34” thirty four,
or three four
“153”
”6091” six eight nine
one
6,891 six
thousand eight hundred ninety one, or six thousand eight hundred and ninety one
6,891.525 six
thousand eight hundred ninety one point (decimal) five two five, or six
thousand eight hundred and ninety one point (decimal) five two five
15,451 fifteen
thousand four hundred fifty one, or fifteen
thousand four hundred and fifty one
183,012 one
hundred eighty three thousand twelve, or one hundred eighty three thousand and
twelve
$75 dollar
sign seventy five (saying dollar sign before the number returns the dollar
amount without cents)
$75.00 seventy five
dollars
$19.95 nineteen dollars
and ninety five cents
½ one half
2
1/4 two
and one quarter
5/8 five slash
eight or five over eight
150/85
Phone Numbers
Result: What To Say:
(954)-555-7700 nine
five four five five five seventy seven zero zero
1-(800)-555-1212 one eight hundred five five five one two one two
Dates and Times
Result: What To Say:
Punctuation Marks
Result: What To Say:
. period/dot
. point (say when using numbers)
; semicolon
, comma
- hyphen/dash
? question mark
-- double dash
! exclamation point/exclamation mark
… ellipsis
: colon
’ apostrophe
/ slash
\ back slash
“ quote/open quote
” quote/end
quote/close quote
‘ single quote/open single quote
’ single
quote/end single quote/close single quote
( left paren/open paren
) right
paren/close paren
[ left bracket/open bracket
] right
bracket/close bracket
< left
angle/open angle/less than
> right angle/close angle/greater than
{ open brace/left brace
} close
brace/right brace
@ at sign
# pound sign
- hyphen (use for minus sign)
+ plus sign
$ dollar sign
= equal sign
% percent sign
^ caret (note if this returns the word “carrot” emphasize the
“a” in your pronunciation(kAy-ret)
& ampersand
_ underscore
* asterisk
| vertical bar