Take
Back Control of Your Inbox
With SpamMonster 2.0!


SpamMonster™ Anti Spam Filter – Version 2.0
User Manual (Release 1.85.048)
September 11, 2006
INTRODUCTION
This is an early release of SpamMonster 2.0. We have been using and testing SpamMonster for some time now and are quite satisfied with the results. Although SpamMonster is still a work in progress, as of the September 11, 2006 release date for this version 1.85.048, we are quite satisfied with the functionality. In fact, we use it to filter our own email accounts.
We are making SpamMonster available for half of the price we will charge for the final release, and this version will upgrade to interim updates (as they are released) and to the final release when its ready (estimated fourth quarter 2006). So, if you are looking for a great anti-spam filter at a bargain price, then SpamMonster is an excellent value for you. And you can use it as a 30-day trial to see if you like it before you buy.
At the end of this manual, you will find a section on Known Issues, and the suggested workarounds for this interim release.
OVERVIEW
SpamMonster™ 2.0 is a powerful yet simple yet easy to use spam filter. When SpamMonster was in the early design stages, we did some research to find out what users want in a spam filter. The two most important criteria user look for in an anti spam filter are that it works without a lot of customization, and that it not delete “good” messages from new contacts that are not yet recognized by the system. SpamMonster has been designed with these two most important criteria in mind.
SpamMonster has a setup wizard that takes only about five minutes to run, and is effective without having to spend a lot of time configuring the filtering parameters. The first time you use it, SpamMonster read the default address book on your computer and adds your contacts to the friends list. To minimize the chance that you will lose an important email, SpamMonster quarantines all emails that it removes from the server by saving a copy locally before it deletes the message from the mail server.
How does SpamMonster work? SpamMonster uses five lists to filter your email:
1. Friends – Email from these senders is left on the mail server. The first time you use SpamMonster, it imports the contact list in your default email program.
2. Good Subjects – Emails containing good subjects are left on the mail server if they are not from an undesirable sender.
3. Bad Subjects – Email containing bad subjects are removed from the mail server.
4. Undesirable Senders – Email from these senders is removed from the mail server.
5. Auto Senders – Email from these senders are removed from the server if they are from SpamMonster. This prevents the return of SpamMonster challenge messages, but let’s receive returned messages that you sent so you will know if a recipient did not receive your message.
The only list that must be populated in order for SpamMonster to work is your friends list. SpamMonster will function just as effectively even if the other lists are not populated, and this is what makes it so easy to setup and use. But it is also easy to populate your other lists by importing them from a text file.
At intervals that you can specify, SpamMonster checks your mail server and filters emails based on the lists. Any emails not in any of the lists are quarantined (saved locally and removed from the mail server), and a challenge message sent to the sender. If the sender replies to the challenge message, then that sender is added to your list of friends and all quarantined emails from that sender are restored to the mail server so you will receive them. SpamMonster sends a confirmation email to confirm to the sender that their email has been restored.
SpamMonster™ 2.0 has a remote commands feature that let’s you add a sender’s email address to your friends list remotely. Just use any computer or your PDA and send yourself an email with the add friend command, the contacts email address and your password. You’ll never have to worry about missing that important email from a new contact you just met. With remote commands, you can also run other programs like your smart house software from anywhere.
SpamMonster™ 2.0 update feature lets you instantly check for and install updates as we keep improving. SpamMonster’s intuitive design, our detailed user manual and the “How To Use SpamMonster” video we’ve produced are designed to make it easy for you to start using and get the most out of SpamMonster.
Now, are you ready to take back control of your inbox? If so, then it’s time go on to the next section.
© Copyright 2002-2006. Jean Gagnon, LLC and CoolSoft, LLC
SpamMonster™ is a trademark of Jean Gagnon, LLC. SpamMonster is distributed and licensed by CoolSoft, LLC under license from Jean Gagnon, LLC, and is the exclusive property of Jean Gagnon, LLC.
Table of Contents
SpamMonster™ Anti Spam Filter – Version 2.0
User Manual (Release 1.85.048)
Using SpamMonster™ 2.0 in Trial Mode
SpamMonster™ 2.0 Trial Startup Dialog
Starting SpamMonster™ 2.0 for the First Time
SpamMonster™ 2.0 Overview of Basic Terminology and Functionality
The SpamMonster™ 2.0 Interface
Minimizing SpamMonster – a/k/a Where did SpamMonster Go?
Using SpamMonster on Another Computer
Running More Than One Copy of SpamMonster on a Single Computer
SpamMonster™ 1.0 Tips – Pointers on what to do, and what not to do:
CoolSoft, LLC Technical Support Policy
KNOWN ISSUES FOR SPAMMONSTER ™ 2.0, RELEASE 1.85.048
GETTING STARTED
System Requirements
System requirements for SpamMonster™ 2.0 are:
|
Operating System: |
Windows 2000 or Windows XP (Home or Professional) with all the latest updates. |
|
Memory: |
At least 265 MB RAM, 500 MB or better preferred. |
|
System Processor: |
A PC with a 500mhz or greater Pentium III, Pentium IV or Pentium compatible processor. |
|
Disk Space: |
200 MB free disk space |
|
Email Account: |
You must have a POP3 Email Account |
Installing SpamMonster™ 2.0
After downloading SpamMonster™ 2.0, double click on the installation file SpamMonster2_0Install.exe, and follow the instructions. If you have the CD, from the main screen, click on “Install” and follow the instructions.
The trial and full install of SpamMonster are the same. You can upgrade to the full version by purchasing a license and registration key. After thirty (30) days, SpamMonster will not start until it is registered.
Starting SpamMonster™ 2.0
To start SpamMonster™ 2.0, either click the SpamMonster™ 2.0 icon on your desktop or use the program menu (StartàProgramsàSpamMonster™ 2.0).

Using SpamMonster™ 2.0 in Trial Mode
If you are using an unregistered copy as a trial, the SpamMonster™ 2.0 startup dialog box (see below) will appear when you start the program. In trial mode, SpamMonsterÔ 2.0 will also display three banner ads: one in the startup dialog box, a second when the program is launching and a third in the program window.
Trial Mode Limitations
Other than these limitations, SpamMonster™ 2.0 is fully functional in trial mode for thirty (30) days.
· Banner ads are displayed.
· The update feature is not available.
· The user cannot customize the challenge message sent by SpamMonster.
SpamMonster™ 2.0 Trial Startup Dialog
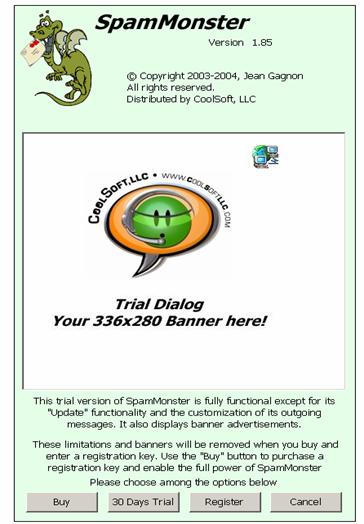
This dialog box displays only if you are using an unregistered copy of SpamMonster in trial mode. It tells you how many days you have left in your trial period and gives you four choices:
Buy – Opens a window in your default web browser, and takes you to the CoolSoft, LLC store page. Your shopping cart will contain one unit of SpamMonster™ 2.0. To complete your purchase, please follow the instructions and provide the required information. You may also want to continue shopping to see our other products, or add items such as a microphone or CD.
30 Day Trial – Lets you continue using SpamMonster™ 2.0 in trial mode. The trial button will be unavailable after 30 days, and after that, you will not be able to start the program until you enter your user information and a valid registration key.
Register - Opens the registration dialog box where you can input your user information and registration key. Your user information and registration key are case sensitive, and you must enter this information exactly as it appears in the confirmation email you receive when you purchase your license and registration key. We recommend you cut-and-paste your registration key from the confirmation email.
After you register SpamMonster™ 2.0, the startup dialog box and banner ads will no longer appear, and the trial limitations will be removed.
Cancel - Exits without starting the program.
Starting SpamMonster™ 2.0 for the First Time
SpamMonster Setup Wizard
The first time SpamMonster™ 2.0 starts, the setup wizard will appear to guide you through the initial setup. You will need the user information from your email account, and you should have this ready before you continue. We also recommend that you be connected to the Internet when you are setting up SpamMonster so it can verify that the information you enter is correct. Note: You cannot start using SpamMonster until you successfully complete this wizard.
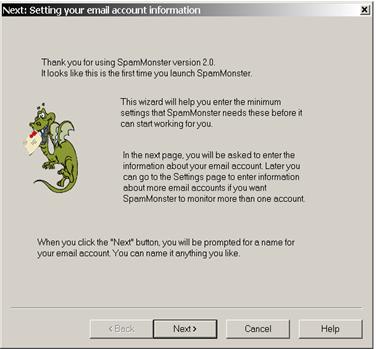
When you are ready, click on “Next>.”
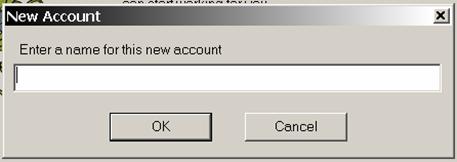
Enter the new name for your SpamMonster email account. We recommend not using spaces in this field. Click OK to continue.
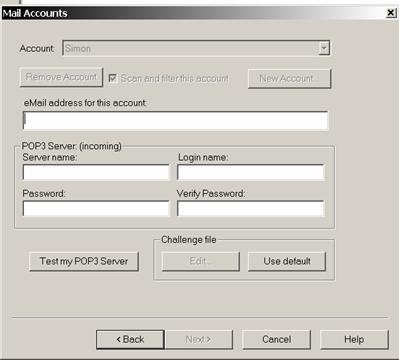
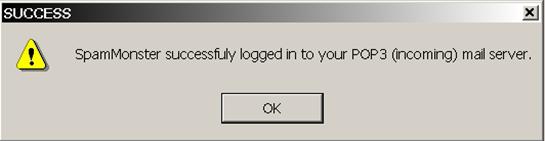
Fill in the information for your email account, then click on the “Test my POP3 Server. The information you entered is correct and you are connected to the Internet, this test will pass. If not, double check your information and try again. This information can be found under settings in your default email program, and was provided to you by your Internet service provider when you signed up for your email account. If you pass the test, you will see the following dialog. Click on OK.
NOTE: SpamMonster encrypts your password information so nobody can use it in case of unauthorized access to your computer.
If you are using a registered copy of SpamMonster, you will also have the option to edit the text in the challenge message file, or to use the default. In trial mode, you are limited to using the default challenge message text.
When you have passed the POP3 test, click on “Next” to continue. You will see the following dialog which explains the next step.
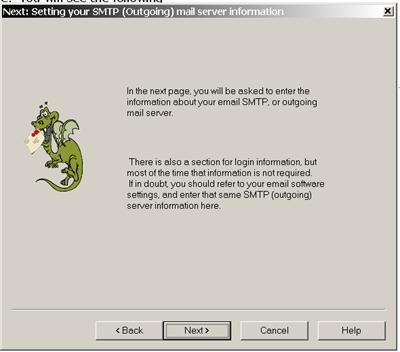
When you are done reading the instructions, click on “Next.”
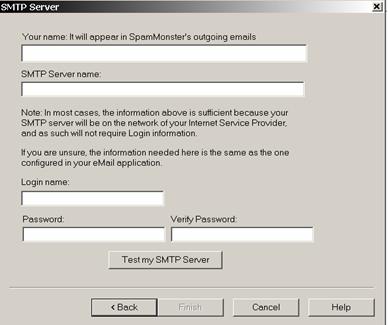
In this dialog, you will enter your name as it will appear on SpamMonster outgoing challenge messages, and the SMTP login information SpamMonster will use to sent its challenge messages. This information can also be found under settings in your default email program, and was provided to you by your Internet service provider when you signed up for your email account
After you enter the information, click on “Test my SMTP Server, and SpamMonster will send you an email with “SpamMonster SMTP Server Test” in the subject line. If SpamMonster is able to communicate with your SMTP server and send this email, you will get the following dialog. Click on OK. Note, you cannot continue until you have completed this step successfully, because it is important for SpamMonster to confirm that it can successfully send challenge messages.
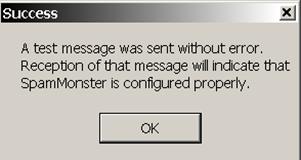
You should also check your email and if you received the email from SpamMonster with “SpamMonster SMTP Server Test” in the subject line. If so, your settings have been entered correctly. Click on “Finish.”
The next step in the Setup Wizard is to populate your Friends list. Here, SpamMonster reads all the contacts in your default address book and imports them into your Friends List.
Click on “Finish,” and SpamMonster is ready to go. You can either use SpamMonster as it is now, or you can go to the Lists tab in Settings and populate the other lists to customize the way SpamMonster will filter your emails. Either way, SpamMonster will be highly effective in filtering most, if not all spam messages.
USING SPAMMONSTER™ 2.0
SpamMonster™ 2.0 Overview of Basic Terminology and Functionality
Before using SpamMonster™ 2.0, you should become familiar with some terminology used by the program.
POP3 Mail Server
This is the server where your email program gets its email.
SMTP Server
This is the server through which your email program sends email.
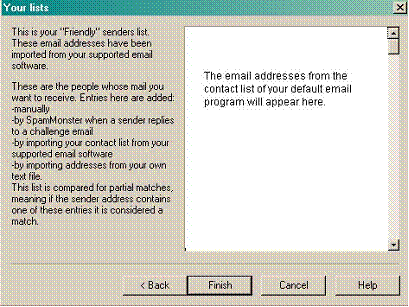
Friends List
Email from these senders is left on the mail server. The first time you use SpamMonster, it imports the contact list in your default email program.
Good Subjects List
Emails containing good subjects are left on the mail server if they are not from an undesirable sender.
Bad Subjects List
Email containing bad subjects are removed from the mail server.
Undesirables Senders List
Email from these senders is removed from the mail server.
Auto Senders List
Email from these senders are removed from the server if they are from SpamMonster. This prevents the return of SpamMonster challenge messages, but let’s receive returned messages that you sent so you will know if a recipient did not receive your message.
Email Status
SpamMonster sets the status of an email depending on what action SpamMonster takes. There are four email status settings. These are shown in the Status column of SpamMonster (2nd column from the right)
On Server: This status means an email is left on the server, and when you check email with your email program or web interface, you will receive the email. SpamMonster leaves messages on the server under five conditions.
1. The sender’s email address is in your “Friends List.”
2. The subject line of the email contains a match for entries in the “Good Subjects List.”
3. The message has a “Bad Header” which means the header of the message is corrupt, and SpamMonster cannot successfully quarantine the message. Because SpamMonster will not delete any message from the mail server until it is backed up in quarantine, SpamMonster will not remove messages with “Bad Headers” from your mail server.
4. The message exceeds 125kb, and is considered too large for Spam (although rarely, a Spam message may be larger than this threshold).
5. The message is from one of the email addresses being filtered by SpamMonster. SpamMonster always emails sent by you come through.
Quarantine: All emails from unknown senders are saved in Quarantine before being removed from the server and challenged. An email from an unknown sender is set to status Quarantined, but will not be removed from the mail server unless it is successfully saved in the quarantine folder. The default location is a sub-folder of the folder where SpamMonster is installed, although you can change the location of the quarantine folder in the SpamMonster settings dialog.
Deleted: Emails from senders in the “Undesirables List” “Bad Subjects List” and “Auto Senders List” are not challenged, however, these emails are also saved in the quarantine folder before being deleted from the mail server.
Delivered: When you check email, the status of Emails that were left on the mail server is changed from “On Server” to “Delivered.” This happens only if you remove the message from the server when you download email, or if you are using webmail, when you move the message to another folder or delete it. Emails with the status of Delivered are only visible in the “All” view window of SpamMonster.
Details Column (Reason for Message Status)
This column shows the reason for the status of an email. The following are possible reasons for an email status:
· Auto Sender Bounced a user email: An auto sender sent back a message you sent, other than a SpamMonster challenge message, and it is left on the server.
· Bad Message Header: The message header is corrupt and the message cannot be saved in quarantine, so it is left on the mail server.
· Bad Subject: The subject line of the email contains a match for an entry in the Bad Subjects List.
· Challenge Message Sent: A message from an unknown sender has been challenged.
· Deleted: An email from an unknown sender, from an auto sender in reply to a SpamMonster challenge, from an email address in the Undesirables List, or containing a match in the subject line for the Bad Subjects List has been saved in the quarantine folder and deleted from the mail server. The reason of “Deleted” in the Details Column is not to be confused with the Status of “Deleted” in the status column. Both emails with the Status of Quarantined and Deleted are deleted from the server.
· Failed to Send Challenge Message: An email from an unknown sender has been quarantined and removed from the mail server, but SpamMonster has been unable to send a challenge message.
· From a Friend: The email address of the sender is in your Friends List.
· From Me: The email was sent by one of the accounts being filtered by SpamMonster.
· Good Subject: The subject line of an email contains a match for an entry in the Good Subject List.
· Saved: A message has been saved in quarantine. The message can be from an unknown sender, an Undesirable Sender, an Auto Sender, or contain a match for a Bad Subject.
· Too Big For Spam: The message size exceeds 125kb.
· Undesirable Sender: The email is from an address in the Undesirables List.
· Unknown Sender: The message is from an unknown sender (one that is not in the Friends or Undesirables list or does not contain a Good Subject or a Bad Subject).
Note that at each step in the processing of an email by SpamMonster, the reason for the most recent action is logged in the Details Column, with the most recent action appearing first. After each reason, SpamMonster tells you in [brackets] why the action was taken. For example, “From a Friend [matched john@doe.com].” Another example, “Too Big for Spam [256kb].” This information is important, because if SpamMonster does something unexpected or undesirable to an email, you can go to the message details to find out why. This helps you to fine tune your lists accordingly. For example, when we were testing SpamMonster during development, one of the entries in our undesirables list was “de” to prevent all spam from an email address with a .de extension. Well, we started to notice we weren’t getting emails from Delta Airlines, and it is this information that helped us to figure out we needed to make changes to our Undesirables List by removing the “de” entry. In this case, we replaced it “@.de” and it solved our problem.
You can view the entire track of the details column for each message when you right click on a message line and select properties. Message properties will be discussed in detail below:
Filtering Order of Lists
SpamMonster filters with the lists in the following order of priority. Note that lists are not case sensitive, so “john” and “John” have the same effect.
Undesirables Senders List: Any email from an address that matches an entry in the undesirables list will be deleted from the mail server and not challenged. Warning: It is best to enter full email addresses in this list, for example “john@xyz.com”. Using partial email addresses, like “john” or “xyz.com” will block any email from a sender with “john” in the email address or from the domain “xyz.com”. This misuse could result in the loss of important emails. For example, if “xyz.com” is in the Undesirables List, and john@xyz.com is in your Friends List, an email from john@xyz.com will be deleted from the server without being challenged, because the Undesirables List has priority over all other lists.
Bad Subjects List: Any email with text in the subject line that matches an entry in the Bad Subjects list will be deleted from the mail server and not challenged. Warning: It is best to enter strings of multiple words in the Bad Subjects List. For example, it is better to use “free cellphone offer” than just “cellphone”. In this example, if someone in your Friends List sends you an email with the subject line “Here is my new cellphone number” with the former the message will be left on the mail server, and with the latter the message will be deleted from the mail server because it is a match for an entry in the Bad Subject List, and the Bad Subjects List takes priority over the Friends List and Good Subjects List.
Friends List: Any email from an address that matches an entry in the friends list will be left on the mail server. Note: A partial email address, for example xyz.com will result in SpamMonster leaving any email from the domain “xyz.com” on the mail server. It is up to personal preference, but we recommend using full email addresses whenever possible.
Good Subjects List: Any email with text in the subject line that matches an entry in the Bad Subjects list will be deleted from the mail server and not challenged. Note: This list is useful for emails where you know the subject, but do not know all of the senders or do not want to enter them all in your friends list. For example, some user groups always have the same signature in the subject line, but come from many email addressees.
Auto Senders List: Any email from an address that matches an entry in the Auto Senders List that is not a reply SpamMonster challenge is left on the mail server. Replies to SpamMonster challenge messages from addresses that match entries in the Auto Senders list are deleted from the mail server. Note: With the Auto Senders List, it is appropriate to use partial email addresses. Examples of such addresses are Postmaster, Mail Delivery SubSystem, Mail Delivery System and MAILER-DAEMON. As you use SpamMonster and become familiar with the program, you will probably find more such addresses.
Remote Commands
NOTE: Remote commands is not fully functional in Version 1.85.048. This issue will be fixed in release 1.90 which is expected to be released in October 2006. When that is released, this version of SpamMonster will update to Version 1.90. If you are using a registered copy of SpamMonster, use the update feature periodically to check for updates.
The SpamMonster remote commands feature lets you send commands to SpamMonster and to your computer’s command line by sending yourself an email with the command in the subject line. To use remote commands, you must first enable it and enter a password in the Preferences tab of Settings.
Your Remote Commands password will be encrypted by SpamMonster so no one can use it if they gain unauthorized access to your computer. However, emails you send containing remote commands will contain this password in the subject line. Email is an unsecured means of communication, and if someone intercepts and reads one of your emails containing a remote command, then can gain access to your password and send remote commands to the command line of your computer by sending you an email. To minimize this risk, you should change your remote commands password regularly.
IMPORTANT NOTE: If you receive an email with a remote command in the subject line that you did not send, it your remote commands password has been compromised, and you must change your remote password immediately.
IMPORTANT NOTE: SpamMonster Remote Commands is a great feature that lets you add contacts to your friends list and send command line arguments to windows so you can run programs like smart house software from any computer or PDA from which you can send an email. However, there is also a risk that if a spammer or other unauthorized individual gains access to your remote commands password, that they could use it to add themselves to your friends list, or send malicious command line arguments that could harm your computer. It is up to you to assess the benefits and risks of using Remote Commands before you enable this feature.
To send a Remote Command that will be processed by SpamMonster, send yourself an email with the following command syntax in the subject line. Make sure the subject line does not contain any other text.
SpamMonster Remote Commands Syntax:
[sm:Remote Commands Password:Command:Object Of Command]
Here are some examples of remote commands:
Add an email address to the SpamMonster friends list:
[sm:1234:addfriend:Simon@CoolSoftLLC.com] – Adds Simon’s email address to the SpamMonster Friends list. This command is particularly useful if you don’t want to wait until you get back to your computer to add a new contact you just met to your friends list.
Run Programs from the Command Line:
[sm:1234:run:notepad.exe] – Starts Notepad on your computer
[sm:1234:run:ahcmd sendplc a1 on] – Turns on module A1 in X10 Active Home Pro
The SpamMonster™ 2.0 Interface
This is what you’ll see when SpamMonster™ 2.0 opens. Note that the banner will disappear when you register SpamMonster.
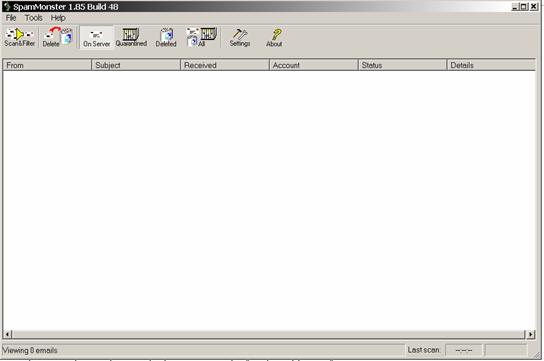
When SpamMonster starts, by default it displays the On Server view, which shows the messages left on the mail server by SpamMonster. Typically, these messages are from senders in your Friends List.
The SpamMonster interface has eight buttons.
Scan & Filter: When SpamMonster is minimized in the system tray, it will Scan & Filter your email account(s) according to the interval specified in settings. The default setting is every five minutes.
Delete: Clicking on this button will delete the selected email(s).
On Server: This is the default view when SpamMonster starts, and it shows email with a status of “On Server” which means the messages that have been left on the mail server for you to retrieve because the sender is in your Friends list or there is a match in the subject line of the email for an entry in your Good Subjects List. You can change the default view in settings.
Quarantine: This view shows messages with a status of “Quarantined.” These messages have been quarantined because they are from unknown senders. A SpamMonster challenge message has been sent.
Deleted: This shows messages with a status of “Deleted.” These messages have been removed from the server because the sender matched an entry in the “Undesirable List,” the subject line contained a match with an entry in the “Bad Subjects List,” or the sender matched an entry in the “Auto Senders List” and it was a reply to a SpamMonster challenge message.
All: Shows all emails that have been scanned and filtered by SpamMonster, including messages that are on the server and messages that have been delivered.
Settings: This button opens the settings dialog.
About: This tells you about SpamMonster, and if you are using a registered copy, this is where the update button is found. The update feature is not functional in trial mode.
Status Bar: At the bottom of the SpamMonster interface is the status bar. This shows the number of emails in the current view, and the time of the last scan and the current status of SpamMonster.
![]()
SpamMonster™ 2.0 Menu
The SpamMonster™ 2.0 menu is very simple.
File Menu
Clear History of Deleted Emails
Exit
Tools Menu
Settings – Settings can also be opened with the Settings Button
-------
Scan & Filter Now (F5) - This can also be done with the Scan & Filter Button
-------
Sort by Sender
Sort by Subject
Sort by Status
Sort by Account
Sort by Time Received
Sort by Details
-------
Find Email – Also “CTRL F” Keys.
You can also sort emails by clicking on the header title at the top of each column.
You can use the Find Email feature to find emails from any of the views (On Server, All, Quarantined and Deleted). Any email matching your search criteria will be highlighted, and you can scroll through the list to find them. This feature is particularly handy when you are expecting and may have received email from someone before you have had the opportunity to add his or her email address in your friends list.
Note on Finding Email: When SpamMonster scans and filters, emails highlighted by the Find Email feature will be unselected. When using the Find Email feature, it is best to enable the “Disable automatic scanning while SpamMonster is in foreground” in the General tab under Settings.
Note on Sorting Email: You can also sort by Sender, Subject, Time Received, Status and Details, in ascending or descending order, by clicking on the column headers. Each time you click on a column header the list will be sorted by that column. Click on the same column header a second time and the sorting status will reverse.
![]()
Note on Sorting by Time: When sorting by time, SpamMonster uses the time it receives the email, and not the actual time stamp on the email. This is because some spammers use invalid dates and times to make their message appear at the top of your inbox.
Help Menu (Version 1.85.048)
Contents (not functional in this release)
-------
About – Opens the About Dialog, where you can check for updates.
Help Menu (As it will appear in the final Version 2.0)
Open Quick Start Guide – Displays the Quick Start Guide in html.
Open Manual – Displays the Manual in html.
Play How To Video – Plays our video on setting up and using SpamMonster
-------
About – Opens the About Dialog, where you can check for updates.
To access the user manual in Version 1.85.058, browse to the folder where SpamMonster is installed, and double click on the file “SpamMonster20UserManual.htm – the user manual will open in your default web browser.
About Dialog
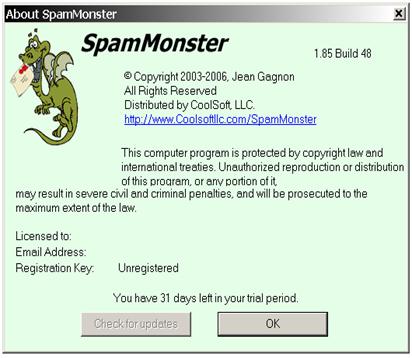
In registered copies of SpamMonster, the “Check for updates button is enabled.
Checking for Updates
When you click on the “Check for updates” button, SpamMonster looks for an available update, and if it finds one, SpamMonster downloads and installs the update. SpamMonster must shutdown to install the update, and should restart when it is finished. However, if for some reason SpamMonster does not restart automatically, you can restart if from the Program menu or desktop icon.
Note: You must be connected to the Internet before checking for updates. Otherwise, SpamMonsterÔ 2.0 will not find any updates.
Right Click Menu
When you are viewing messages in SpamMonster, you can right click on a message and the right click menu will appear. The content of the right click menu depends on the message Status.
From On Server View

- Delete: Deletes this message only.
- Delete and add this email address to my undesirables list: This deletes all messages from this sender and adds the sender to your undesirables list. Messages from this sender will always be deleted from the server without being challenged.
- Properties: See the “Properties” section below.
From Quarantined View

- Restore to Server: Restores this message only to the server.
- Restore all emails from this sender to Server and add this email address to my friends list: All deleted emails from this sender are restored to the mail server, the sender is added to the friends list, and all future emails from this sender are left on the mail server to be delivered.
- Purge this email and add this email address to my Undesirables List: This deletes all messages from this sender and adds the sender to your undesirables list. Messages from this sender will always be deleted from the server without being challenged.
- Open: Opens the message in Outlook Express or Outlook.
- Properties: See the “Properties” section below.
From Deleted Messages View

- Open: Opens the message in Outlook Express or Outlook.
- Properties: See the “Properties” section below.
- Restore to Server: Restores that message to the mail server.
Status Delivered (All View)
There is no right click menu for messages that have been delivered, since they are no longer on the mail server.
Messages Restored to Server (All View)
Messages restored to the mail server by SpamMonster, either by way of a senders reply to a challenge message or from the right click menu, are marked by SpamMonster in the subject line, so SpamMonster will be able to identify it as a restored message and will not delete it again the next time it Scans & Filters.
Message Properties
When you right click on a message and select properties, the message properties dialog box appears. The fields are self-explanatory, with the exception of “Checksum:” which is of relevance only to SpamMonster.
If you want to see the entire thread under the “Details” view, then you can scroll through the “Reason for status:” line in message properties.
You can also read the email from message properties, however, messages are converted to Raw Text and emails sent in HTML lose the message formatting. If you want to see a deleted or quarantined message in its original HTML, then click on “Open” from the right click menu, or double click on the message, and it will open in Outlook Express or Outlook.
Note that emails with a status of “On Server” or “Delivered” cannot be opened locally, and the message properties will not contain the “Raw Text” of the message. If you want to see these messages, check your email.

SpamMonster™ 2.0 Settings
The SpamMonster settings dialog has four tabs. Each tab is shown and discussed in detail below:
General Tab
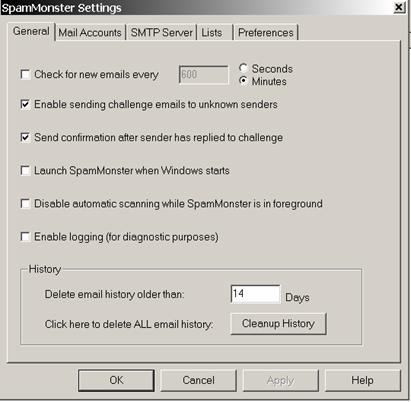
The general tab is shown with the default settings. For the most part these are self-explanatory, but it is important to note a few things:
If you uncheck “Enable sending challenge emails to unknown senders” then emails from unknown senders will not be challenged, and the sender will not know his or her email was not received.
You may find it useful to enable the “Disable automatic scanning while SpamMonster is in foreground” setting. This will prevent new emails from being added to your lists while you are reviewing them. This will help prevent missing a new email after you have started to review one of the lists.
If you “Enable logging,” this may slow down the performance of SpamMonster, but it most cases this will not be noticeable. You should enable logging only if requested to do so by technical support. NOTE: I Version 1.85.048, enable logging may cause SpamMonster to close immediately when it starts. We do not recommend checking this selection in this current version.
The default for “Delete email history older than:” is 14 days. Quarantined emails and the email history do not take up much disk space, and it is recommended that you keep the default setting. Note that the number days is not the number of days from when the email was received by SpamMonster. It is the number of days after you have reviewed your lists. So if an email is quarantined on Day 1, and you review your Quarantine list on Day 3, that email will be deleted on Day 17.
Clicking the “Cleanup History” button will immediately delete quarantined emails, and we do not recommend using this button unless you have thoroughly reviewed the lists of Quarantined and Deleted emails immediately prior to this, and while “Disable automatic scanning while SpamMonster is in foreground” is checked.
Mail Accounts Tab

This is where you can enter email accounts to be filtered by SpamMonster. When you start SpamMonster for the first time, the SpamMonster Wizard will help you setup your first account. It will appear in the “Account” dropdown, as will other accounts you add later.
Challenge File: In trial mode (as shown above) you cannot edit the SpamMonster Challenge Message. In registered copies of SpamMonster, you can create a custom Challenge Message by editing the default, or you can choose to use the default SpamMonster Challenge Message.
If you click on the “Remove Account” button, you cannot recover the account, and you will have to reenter the information. Be sure you want to remove an account before clicking this button.
SMTP Server Tab
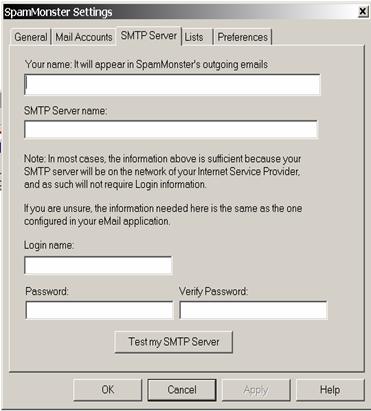
This tab contains the SMTP server settings used by SpamMonster to send its challenge messages. Usually, you should not have to edit this information unless you change email providers.
Lists Tab
The List Tab is divided into five sub-tabs, one for each SpamMonster list. Each sub-tab is shown below, and with the exception of the Friends List sub-tab which also allows you to “Black List” an email address and import lists from your email program or a text file, all have the same buttons.
Also note that SpamMonster filters duplicate entries from the list display, and sorts lists in ascending order. So if an email address is entered twice, you don’t have to worry about it, and you can easily scroll through the lists and delete any duplicates.
Friends List

Blacklist Button – There are times when a spammer may get into your friends list by replying to a SpamMonster challenge message, or you may want to move an email address from your Friends List to the Undesirables List. Clicking this button will move the selected (highlighted) email address to the Undesirables list.
Do not filter email based on this list - The default on this and all other lists is enabled. You can choose not to filter any or all of the lists by checking the option. Note: Checking this option in the Friends List is not recommended, and will result in all emails from addresses in the Friends List will be treated as unknown senders all the time.
Add New Button – This opens the Add New dialog shown below. You can enter one email address, or multiple email addresses separated by commas. Using this option, you can even copy and paste a large list taken from a text file.

For example, you can enter a single or partial address “john@johndoe.com” or “johndoe.com” or multiple full or partial addresses such “john@johndoe.com,jane@jandoe.com,smith.com,….”
Edit Button – Opens the Edit list entry dialog shown below. This let’s you edit the selected (highlighted) email address.

Delete Button – Deletes the selected (highlighted) email address.
Import Button – Lets you import or update lists from the contact list of your default email program, or from a comma separated or one address per line text file. SpamMonster filters out duplicate entries, so this is a good way to update your friends list with your email program from time-to-time.

Undesirables List

Good Subjects List

Bad Subjects List

Auto Senders List

Preferences Tab

On Startup, show this view: - You can choose the list that SpamMonster will display when it starts. The default is the On Server View (see below).

When a new email comes in - You can choose one of the following notification options.

Show gridlines in the main window – SpamMonster will display gridlines as shown below if this setting is enabled.
I use Outlook Express, have it get emails when new Friendly emails have been found – If you are using Outlook Express and you enable this setting, Outlook Express will automatically receive those emails. NOTE: This feature is not currently functional in Version 1.85.048.
Remote Commands
To enable Remote Commands, check the box under this section and enter a password you will remember. For more information on Remote Commands, see the section on Remote Commands above.
IMPORTANT NOTE: Your Remote Commands password will be encrypted by SpamMonster so no one can use it if they gain unauthorized access to your computer. However, emails you send will contain this password in the subject line. Email is an unsecured means of communication, and if someone intercepts and reads one of your emails containing a remote command, then can gain access to your password and send remote commands to your computer by sending you an email. To minimize this risk, you should change your remote commands password regularly, and change it immediately if you receive an email with a remote command that you did not send.
Reset Prompts Button – Many of the message prompt dialogs in SpamMonster enable you to check the option not to display the prompt again. Clicking on the Reset Prompts Button brings them all back to their default setting.
Folder for SpamMonster data files: - The default for SpamMonster lists, settings, data and quarantine folder is the folder where SpamMonster is installed. If you wish to change the default, you can use this feature to do that. Click on the “…” button and a select file dialog will open. Browse to the location where you want to keep your SpamMonster files. SpamMonster will check for adequate disk space, and if adequate disk space is available will move all of your lists, settings, data and quarantine folder to the new location, and adjust your settings file (spammonster.ini) accordingly.
Minimizing SpamMonster – a/k/a Where did SpamMonster Go?

When you minimize SpamMonster, it disappears into the taskbar in the lower right hand corner of your desktop, with the other taskbar icons to the left of the clock. But don’t worry, even when minimized, SpamMonster is there doing its job. When SpamMonster is Scanning & Filtering, you can see it devouring your spam.
When SpamMonster is minimized and you right click on the SpamMonster icon in the lower right of the taskbar, you have four choices which are self-explanatory:
About SpamMonster
Help
Settings
Exit
Advanced
Uninstalling SpamMonster
To uninstall SpamMonster, you must go to the Add and Remove Programs dialog in the Windows Control Panel. In order to prevent the unintentional deletion of your settings and quarantined email, the SpamMonster uninstaller will not remove your SpamMonster settings (SpamMonster.ini) lists, log files, email database file or emails in the quarantine folder. This is to prevent the unintentional deletion of an email. These must be removed manually from My Computer or Windows Explorer.
Using SpamMonster on Another Computer
Your SpamMonster settings (SpamMonster.ini) and lists can be copied to and used with another installation of SpamMonster on another computer. Just copy the SpamMonster.ini and all files with the extension of .lst to the folder where SpamMonster is installed on the other computer.
Running More Than One Copy of SpamMonster on a Single Computer
This is only for advanced users, and will only work if the two copies of SpamMonster are filtering different accounts. You may want to do this if a computer has more than one user, and the two users have different criteria for filtering email. In this case, it is always best to run SpamMonster on two different computers, but if that is not possible you can run two copies of SpamMonster at once if they are configured properly.
Whenever it starts, SpamMonster checks the computer for another running copy of SpamMonster. If it finds one, then SpamMonster tests for the account(s) the other copy is filtering. If one of the accounts matches an account an account that is being filtered by another copy of SpamMonster, SpamMonster will prompt you and will not start. This is to prevent the filtering of a single account on one computer by more than one copy of SpamMonster, which could result in lost emails.
To setup a second incidence of SpamMonster on the same computer, copy your SpamMonster files to another unique folder. Then manually create a shortcut (right click on the SpamMonster.exe file and select “Create Shortcut”. You can copy this shortcut to the desktop, start menu or startup folder.
With the first installation of SpamMonster closed, start the second installation and edit the account information so the accounts the second copy is set to filter are different from the accounts to be filtered by the other copy of SpamMonster.
Now you should be able to start and run both copies of SpamMonster simultaneously. It may be a good idea to create shortcuts to each copy of SpamMonster and place them on your desktop.
SpamMonster™ 1.0 Tips – Pointers on what to do, and what not to do:
Do review the Quarantine and Deleted lists every few days to make sure you haven’t missed an important email. Another feature of SpamMonster is that it will not delete emails from Quarantine for the number of days after you view the Quarantine and Deleted lists. SpamMonster is designed to help prevent you from missing an important email, but nothing is 100% guaranteed. You need to do your part too, and SpamMonster is designed to make that easy for you.
Do be careful with entries in the Undesirables and Bad Subjects lists. With your undesirables list, it is always best to use full email address. For example: john@johndoe.com. With the Bad Subjects list, it is better to use multiple words since SpamMonster will look for a full match, and using multiple words in this list will minimize the chance of deleting a good email because of one word in the subject line.
Don’t use full domains in the Undesirables List unless you are certain you want to block emails from all senders at that domain. Using a partial email address like “aol.com” will block any email sent from this domain, which in this example can result in you missing important emails from AOL users. So be careful when you enter a partial domain or email address.
APPENDIX
CoolSoft, LLC Technical Support Policy
In order to keep the cost of our products low, CoolSoft, LLC provides technical support to registered users on a best efforts basis only. We will do our best to help you resolve your issue, but we cannot guaranty a solution.
We cannot respond to requests for support on the following:
· How-to questions or technical issues that are covered in the Users Manual, Release Notes or in our FAQ’s. For example, a question where it is obvious that the user has not taken the time to read the manual, FAQ’s or other resources and follow the instructions.
· Issues related to third party programs such as your email program, or problems with SpamMonster™ 2.0 caused by those programs.
· Questions from unregistered users who have not purchased a registration key. To keep the cost of our products low, we cannot support trial users. To get support, you need to provide your email address and either your order number or a valid registration key for one of our products, and submit your request through the convenient on-line form in the Support section of or website.
· Requests for support that do not provide the required information.
Support on Third Party Software
We cannot support third party software. If you need support with another program, for example your email client, or issues with SpamMonster that are caused by another program, use the help feature in that program, or contact the manufacturer’s technical support directly.
KNOWN ISSUES FOR SPAMMONSTER ™ 2.0, RELEASE 1.85.048
As of the September 11, 2006 release date, the following are major known issues for SpamMonster™ 2.0, Release 1.85.048, and some suggested workaround. These and other known issues will be addressed in upcoming interim releases and the final release.
If you find other known issues, please send an email to support@coolsoftllc.com and give us a description of the problem and tell us how to recreate it. Since SpamMonster is still a work-in-progress, we may not get back to you, but be assured any problems will be passed on to the development team.
Known Issues With SpamMonster and Recommended Workarounds:
Help Menu is not Finished
The help menu is not finished, and the Content selection in the dropdown is not functional. To view the SpamMonster user manual, browse to the folder where SpamMonster is installed, and double click on the file “SpamMonster20UserManual.htm – the user manual will open in your default web browser.
SpamMonster and Outlook Express
The “I use Outlook Express, have it get emails when new Friendly emails have been found” feature is not functional in Version 1.85.048. This does not affect the operation of either SpamMonster or Outlook Express. When this feature is fully functional in Version 2.0, when SpamMonster sees an email from a Friend on the server, it will cause Outlook Express to check for messages. The workaround is to manually check for email in Outlook Express as you would normally do.
Remote Commands
Remote commands is not fully functional in Version 1.85.048. This issue will be fixed in release 1.90 which is expected to be released in October 2006. When that is released, this version of SpamMonster will update to Version 1.90. If you are using a registered copy of SpamMonster, use the update feature periodically to check for updates.
Still Getting Spam After Starting SpamMonster
Problem: When you first start SpamMonster, or when you start SpamMonster after it has not been running for a while.
Workaround: This is normal. When you start SpamMonster, it needs time to scan, filter, quarantine and challenge emails, and you should wait for a while before checking email. How long depends on the speed of your Internet connection, how long SpamMonster hasn’t been running and how many emails you have on the server. This time will be different for every user, so there is no exact way to determine the time you need to wait other than trial and error.
To avoid this problem, we recommend you leave a copy of SpamMonster running all the time on a computer that is always connected to the Internet. If that’s not practical for you, then just wait a little while between starting SpamMonster and checking email.
Registration Key Doesn’t Work
Problem: When you purchased SpamMonster, you received a registration key. When you try to input your registration key, it doesn’t work.
Cause: There is a bug in the validation logic, and the registration key for SpamMonster does not work with all combinations of First Name, Last Name and email address.
Work Around: SpamMonster will function for 30 days without a registration key. If this happens to you, keep using SpamMonster in trial mode. With the exception of not being able to edit the challenge message and displaying the trial dialog and banners at startup, SpamMonster is fully functional in trial mode. Within 30 days, you will either receive another registration key that is valid, or a new program file and registration key will be sent to you. You do not have to ask for this. If you purchased SpamMonster, you will receive it before your 30 day trial expires.
Email is Not Restored After Right Click Restore or Response to Challenge Message is Received
Problem: You right clicked on an email and selected “Restore to Server” or “Restore all emails from this sender to Server and add this email address to my Friends list” and i) the email did not restore, ii) the challenge message (or one of multiple emails) was restored but one or more of the original emails were not restored.
Problem: A user responded to a challenge message. The challenge message was received and restored, but not the original message.
Cause: Unknown at this time. We are not able to reproduce this consistently, and most of the time the restore feature works properly. Finding and fixing this bug is a priority.
Work Around: Neither of the above issues occur frequently or consistently, but it does happens to you, you can find the email(s) you tried to restore from My Computer or Windows Explorer by searching the sub-folder for the SpamMonster account you are using in the SpamMonster Quarantine folder. Search for the first part of the email address using wild cards “*”. For example to find an email from johndoe@mydomain.com search for “*johndoe.*” – omitting the quotes from your search criteria. When you find the email(s), right click and select open. The email should open in Outlook or Outlook Express. From here, you can save it to any folder on your computer by going to File, Save As.
To make sure you get future emails from this sender, add his or her email address to your friends list.
History is not Cleared in Accordance with Settings and Emails are Left in the Quarantine Folder
Problem: History is not cleared after the number of days in settings.
Cause: SpamMonster is designed not to delete quarantined or deleted emails for the number of days after you’ve checked your lists. This is to add an additional layer of protection to prevent good emails that inadvertently end up in the quarantine folder from being deleted. The theory is not to delete emails for a set number of days after the user has looked at the list. There is a bug in the logic of this function, and SpamMonster does not delete any emails.
Work Around:
From the General Tab of Settings, click on the “Clear History” and this will clear the list of emails beyond the set number of dates, but will not delete emails in the quarantine folder. To delete emails from the quarantine folder, in My Computer or Windows Explorer, find your quarantine folder and go into the sub-folder for your account. Select emails in the corresponding date range and delete them.
SpamMonster is Crashing Consistently
Problem: Every few hours, SpamMonster crashes. You get two error dialogs, which results in SpamMonster closing.
Work Around: We have determined that this is caused when the History list has too many entries. This is caused by the “History is not Cleared…” bug above. Clearing the SpamMonster history as described above solves this problem.
SpamMonster is Running in the System Tray, but is not Working
Problem: SpamMonster has been minimized to the system tray and it has stalled, and is not filtering email.
Work Around: Bring SpamMonster to the foreground (click on the SpamMonster icon in the tray. Click on the Scan & Filter button, and minimize SpamMonster. It should now function normally.
SpamMonster is Filtering Most, but not All Spam
Problem: Most spam is filtered, but some still gets through.
Causes:
1 – Spam was received by your server between Scan & Filter intervals.
2 – A Spammer responded to a challenge message and has been added to your friends list. We are working on a solution to prevent this.
Work Around:
For Cause 1, this is normal functionality. Shorten the interval between scans (Settings, General Tab, Check for new emails every:__). If you get lots of Spam, a scan interval of 1 minute is good. If you get less spam, try 3 or 5 minutes.
Cause 2 – If the email has not been delivered, it will appear in the “On Server” view an you can right click on the message to delete it and add the sender to your Undesirables list. Otherwise, you need to manually add the sender’s address to the Undesirables list.
SpamMonster Challenge Messages are Being Returned and Received
Problem: You are receiving returned challenge messages.
Cause: SpamMonster is supposed to reject returned SpamMonster challenge messages from auto-senders if the auto senders email address is in the Auto Senders list. The behavior is reliable, but not 100% consistent.
Work Around: Check to see if the Auto Senders partial email address in the rejected message is in the Auto Senders list and that the list is enabled for scanning. Recommended entries in the Auto Senders list are partial email addresses that consist of the following:
Mail Administrator
Mail Delivery Subsystem
Mail Delivery System
MAILER-DAEMON
post master
There may be others. Look for a common string in the rejected challenge messages you are receiving. If you find one, add it to your Auto Senders list, or if the domain is consistent and one you are sure you don’t want to receive emails from, add the domain to your Undesirables list and messages from that domain will no longer be challenged.
If the auto sender address is in your Auto Senders list, just delete the email. This is annoying, but not critical and eventually we will find a solution to make this feature closer to 100% reliable.