
CoolSoft, LLC FlyingHouse™ 2.0
Image Capture and Transfer
Software for Webcams
FlyingHouse™ 2.0 User Manual
August 15, 2006
With FlyingHouse™ 2.0, you can take pictures from your webcam, upload them to the Internet, and view them from anywhere with a computer and Internet connection! FlyingHouse™ 2.0 lets you specify the time interval for taking pictures so you can do time-lapse photography. You can also use it to secure your computer. Leave it running while you’re gone, and if someone takes your computer, your webcam uploads his or her picture so you can identify them. Point your webcam out the window and if someone comes near your house, you have their picture. FlyingHouse™ 2.0 can be configured to save pictures to your computer’s hard drive, so it works even when there is no Internet connection. The pictures you take with FlyingHouse™ 2.0 can be used to create slideshows with many of the most popular image viewing applications.
FlyingHouse™ 2.0, lets you use any webcam to take pictures, which makes it an excellent, low-cost alternative to high-priced network cameras and security software.
© Copyright 2004-2006, CoolSoft, LLC and Le Groupe MontrealSoft, Inc. All rights reserved.
FlyingHouse is a trademark of CoolSoft, LLC and Le Groupe MontrealSoft, Inc. FlyingHouse 2.0 is distributed by CoolSoft, LLC under license from Le Groupe MontrealSoft, Inc., and is the exclusive property of Le Groupe MontrealSoft, Inc.
FLYINGHOUSE 2.0 – PROGRAM OVERVIEW
FlyingHouse is a utility designed to take pictures from your webcam and upload them to an FTP where you can browse the pictures from any place where you have a computer and Internet connection, using Internet Explorer or most other web browsers or FTP software. It is a low-cost alternative to expensive network security cameras and software. The new Version 2.0 is completely rewritten from the ground up in the latest programming language, Visual Studio .Net.
FlyingHouse was originally designed for CoolSoft, LLC’s founder so he could monitor his house during Hurricane Frances in 2004. FlyingHouse is designed to switch to dialup when the network connection is broken, and when used with a notebook, it will continue to upload pictures even after the power fails. It also reconnects to the network or dialup when power and Internet access are restored.
FlyingHouse lets you determine the length of the interval for taking pictures, making it ideal for taking time-lapse photography. FlyingHouse even works in places where there is no Internet connection by saving pictures directly to your hard drive.
Although FlyingHouse was originally designed and developed for use in emergency situations such as hurricanes, you can use it in everyday applications to take and upload pictures to an FTP from any location where you have a computer, webcam and Internet connection. You can then view the pictures from any place where you have access to a computer and an Internet connection.
FlyingHouse can be configured to send pictures by network, wireless or dialup connection, and is designed to switch to dialup if the network fails, and to automatically reconnect if your FTP connection fails temporarily. This feature is particularly useful in case of a power failure. Typically, telephone lines are the last to fail, and sometimes do not fail at all even in the worst of circumstances. At the end of this manual is a section that shows you how to setup your computer and FlyingHouse to continue sending images via battery power and dialup connection, long after power and network connections have failed.
Here’s a disclaimer to keep the lawyers happy: Although we think FlyingHouse is reasonably reliable to take the place of network cameras and security software, it is a consumer desktop application that is not intended for use in mission critical environments. If you are using FlyingHouse in an emergency such as in an area subject to hurricane or flood warning, your computer and other equipment you leave behind could be damaged by the disaster. This is your responsibility, and CoolSoft, LLC is not liable for any lost data or damaged equipment.
Table of Contents
FLYINGHOUSE 2.0 – PROGRAM OVERVIEW
FlyingHouse™ 2.0 in Trial Mode
The FlyingHouse™ 2.0 Interface
Taking and Uploading Pictures with FlyingHouse™ 2.0
Viewing Images Uploaded to Your FTP by FlyingHouse™ 2.0
CoolSoft, LLC Technical Support Policy
KNOWN ISSUES FOR FLYINGHOUSE™ 2.0, August 15, 2006 RELEASE
GETTING STARTED
System Requirements
|
Operating System: |
Windows 2000 or Windows XP (Home or Professional) with all the latest updates. |
|
Memory: |
At least 265 MB RAM, 500 MB or better preferred. |
|
System Processor: |
A PC with a 500mhz or greater Pentium III, Pentium IV or Pentium compatible processor. |
|
Disk Space: |
100 MB free disk space |
|
Hardware: |
A USB webcam and one or more of a 100mbps network interface card, wireless modem or 56k modem. |
|
Disk Space: |
100 MB free disk space |
|
FTP Account: |
You must have an FTP account from an Internet service provider. It must be configured so you can browse the folder from HTTP. |
|
An Internet Connection |
You must have either a high-speed or dialup Internet connection. |
Installing FlyingHouse™ 2.0
After you have downloaded FlyingHouse, to install the program, just double click on the installation file FlyingHouse10Install.exe, and follow the instructions. If you have the CD, from the main screen, click on “Install” and follow the instructions.
FlyingHouse™ 2.0 in Trial Mode
The trial version has no limitations and free for 30 Days. To upgrade from the trial version, simply reinstall the full version you downloaded after purchasing your license for FlyingHouse.
Starting FlyingHouse™ 2.0
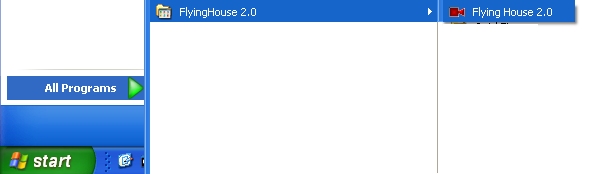
To start FlyingHouse, first make sure your webcam is plugged in. FlyingHouse will not work if you do not have a webcam connected to your computer. Then, either click the FlyingHouse icon on your desktop or use the program menu (StartàProgramsàFlyingHouse).
USING FLYINGHOUSE™ 2.0
Webcam and Webcam Drivers
Make sure your webcam is plugged in, and that you have the latest drivers. Flaws in some webcam drivers may prevent FlyingHouse from working properly. Whenever possible, visit the webcam manufacturers website and install the latest driver for your webcam.
If your webcam is not plugged in when you start FlyingHouse, you will see a “No Camera Detected” message in the camera window, the “Start” and “Abort/Stop” buttons will be disabled, and FlyingHouse will not work. If this happens, shut down FlyingHouse, plug in your webcam, and then restart FlyingHouse.

![]()
The FlyingHouse™ 2.0 Interface
This is what you’ll see when FlyingHouse opens.
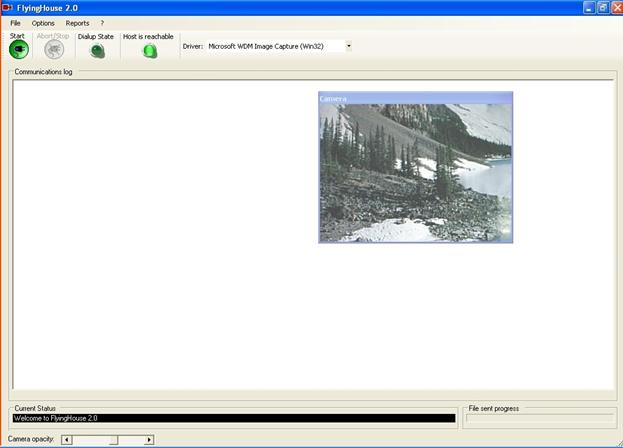
Menu
The upper left of the FlyingHouse interface contains the menu. The menu functions are discussed in more detail below.
Buttons
The program function buttons are located in the section below the menu.
· Start - Use this button to start FlyingHouse if it is not configured to automatically connect on startup. It is not necessary to use this button if FlyingHouse is already configured to automatically connect on startup (see Options, General Options, Connect on Startup).
· Abort/Stop - Use this button to stop FlyingHouse from taking and sending pictures. While FlyingHouse is taking and/or sending pictures, the General Options menu item is not available - FlyingHouse must be stopped in order for you to modify its General Options settings. . This button is also disabled if there is no camera connected to your computer.
· Dialup State – Green indicates that FlyingHouse is connected to the Internet by dialup connection.
· Host is Reachable – Green indicates that FlyingHouse is connected to the Internet by a network connection, and is able to reach your FTP.
Driver:
To the right of the buttons is the Driver dropdown menu that allows you to select the camera drivers. Typically, Microsoft WDM Image Capture (Win32) is the only option, and we recommend using this default.
Communications Log
This section displays a log indicating the connection status and progress as FlyingHouse is taking and/or sending pictures.
Camera Window
The camera window is opaque and typically appears over the Communications Log section of FlyingHouse. Note that you can move the camera window by placing your cursor on the “Camera” title bar and holding down the left mouse button while dragging the camera window to the desired position on the desktop. The Camera opacity can be adjusted with the slider in the lower left corner of the FlyingHouse interface.
Status Line
Below the Communications Log is the status line. It displays the current status and the progress when FlyingHouse is sending a picture (File sent progress).
FlyingHouse ™ 2.0 Menu
The FlyingHouse menu is simple and easy to use.

File:
Quit – Quits FlyingHouse. If a picture is in the process of being sent, FlyingHouse will finish sending the picture before closing.
Options:
Camera Options
The submenu items under Camera Options let you configure your camera options, for example color, brightness, contrast, image size/quality and frame rate. There are three submenu items available, and the dialogs displayed under these submenu options may vary depending on your camera drivers. The picture below is for a Logitech QuickCam Communicate STX webcam. We recommend keeping the default settings, although you may want to experiment with different settings to see what works best for you. Typically you will see the following dialogs for each option in the Camera Options submenu.
Source DLG
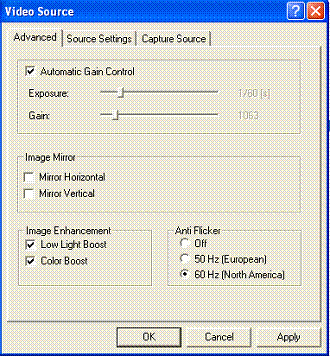
This dialog enables you to adjust your camera settings. If you have more than one camera installed on your computer, use the Capture tab to select which camera you want FlyingHouse to use.
Display DLG
Typically grayed out and not available. This menu option will be available only if your webcam drivers support it.
Format DLG
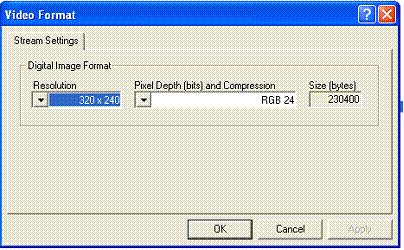
This dialog enables you to adjust image resolution (size) and Pixels Depth (bits) and Compression (quality).
TIP: If disk space on your FTP account is limited, or if bandwidth is limited either from the connection where FlyingHouse is running or where you will later view the pictures taken and uploaded by FlyingHouse, we recommend changing the camera settings to a smaller image size (see Format DLG), and taking images less frequently (General Options, Interval between each picture). This will make uploading, viewing and downloading pictures faster. If you have ample disk space and bandwidth, and/or you want higher quality pictures, you can set the camera settings for a larger image size.
General Options – Below is a view of the General Options dialog. This is where you configure FlyingHouse to automatically connect and start sending pictures upon startup.
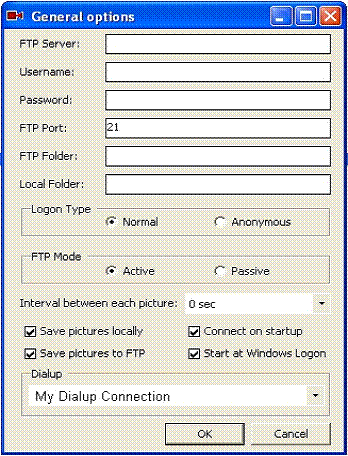
FTP Server – Must be entered exactly as provided by your FTP service provider.
Username – Must be entered exactly as provided by your FTP service provider.
Password – Must be entered exactly as provided by your FTP service provider.
FTP Port – The default is Port 21. Change this only if required by your FTP service provider.
FTP Folder – If you want FlyingHouse to save pictures in the root of your FTP, then leave this blank.
If you want FlyingHouse to save pictures in a folder or subfolder of your FTP, enter the folder name here. A slash “/” does not need to precede the folder name; however if you are using a subfolder, a slash “/” must follow each successive subfolder of the main folder. For example if you are using the Pictures folder enter:
Pictures
If you are using a subfolder of the Pictures folder, for example “Camera1” then enter:
Pictures/Camera1
NOTE: You must also create the corresponding folder and/or subfolder (if any) in your FTP account.
Local Folder – In order to use the “Save pictures locally” option, you must first create a folder on the local computer (the computer where FlyingHouse is running) and enter the path to that folder here.
Logon Type – The default is Normal. Use Anonymous only if required by your FTP service provider.
FTP Mode – The default is Active. Use Passive only if required by your FTP service provider.
Check Boxes
Interval Between Each Picture – Select the desired interval from the dropdown list. The choices are 0, 5, 10, 20 and 30 seconds, and 1 and 2 minutes. If you choose 0 seconds, then the interval will be continuous.
Note: The interval starts when FlyingHouse is finished uploading its last picture, so the actual interval between pictures may vary depending on your connection speed. For example, if you desire a 30 second interval, and you are on a dialup connection the actual interval will exceed 30 seconds. To mitigate this problem, you can select a shorter interval, for example 20 seconds, and the upload time plus 20 seconds will more closely approximate the desired 30 seconds. If you are saving pictures locally only, then the interval starts when the picture is saved locally, and there is no delay.
Save pictures locally – When this option is checked, FlyingHouse will save pictures directly to your hard disk. If your hard disk runs out of space with this setting checked, FlyingHouse will stop taking and uploading pictures. Use this only if you think there is enough disk space on your computer for the time interval that you want to capture pictures.
Save pictures to FTP – When this option is checked, FlyingHouse will upload pictures to the FTP. To use this option, your computer must be connected to the Internet, you must have an FTP account, and FlyingHouse must be configured (as above) for your FTP account.
Connect on Startup – When this option is checked, FlyingHouse will automatically start taking pictures when you start it, according to its setting.
Start at Windows logon – When this option is checked, FlyingHouse will start automatically when Windows starts.
NOTE: If you are using FlyingHouse in an environment where the computer may shutdown unexpectedly (for example you are expecting a power failure) and you want FlyingHouse to resume taking pictures when Windows restarts, then check this option, and also check the “Connect on Startup” option above.
Under these conditions, you should configure your computer BIOS so that the computer will restart automatically when power is restored. You will also want to configure Windows to automatically login to the desired user account without having to input a username and password each time. For more detailed instruction on how to do this, see the Advanced section below.
Dialup – The dropdown will display dialup connections that are configured on your computer. Select the dialup connection you want to use if the network connection fails. FlyingHouse always looks for a network connection first, and if it doesn’t find one, defaults to dialup automatically.
NOTE: FlyingHouse can be used with or without a dialup connection, and can also be used exclusively with a dialup connection when no network connection is present.
OK – Save changes and close dialog.
Cancel – Exit dialog without saving changes.
Reports:
Select the View Log submenu item to display the FlyingHouse log. You can save the log to a file, which is useful when needed for troubleshooting.
? (About):
User Manual – Displays this User Manual.
License Agreement – Displays the FlyingHouse License Agreement.
About – Opens a dialog that displays information about FlyingHouse.
Taking and Uploading Pictures with FlyingHouse™ 2.0
Once FlyingHouse is configured and set to start automatically, the rest is easy.
Once started, FlyingHouse looks first for a network connection to the Internet, and if it doesn’t find one then connects by dialup. When FlyingHouse is connected to your FTP, it starts to capture and upload pictures to your FTP according to the settings you have configured. If you have the “Save pictures locally” option checked, FlyingHouse saves the pictures directly on the local computer. This is useful when you do not have an Internet connection available.
You can see the FTP communications log, current status and progress in the lower part of the FlyingHouse interface.
Viewing Images Uploaded to Your FTP by FlyingHouse™ 2.0
Pictures that have been uploaded to your FTP account can be viewed from Internet Explorer. Just enter the same FTP server address you use for FlyingHouse, preceded by ftp:// (Example: ftp://myftp.com). If FlyingHouse is uploading pictures into a subfolder, enter the path to the subfolder (Example: http://www.myftp.com/SubFolder) or double click on the subfolder once you are logged in to the FTP.
Typically, browsing to your FTP account in Internet Explorer will open to a public folder on your website. Or you may get a “page not found” or other access error message. From Internet Explorer, go to File, and select “Login As.” Enter the user name and password for your FTP account and click the “Login” button.
A directory listing of pictures (pictures are named in a date/time format) will appear as links. To view a specific picture, click on the corresponding link. To download the pictures, select the range of pictures you want to download. Right click and select “Copy” (or “Cut” if you want to move them). From My Computer or Windows Explorer, and paste the selected pictures into a folder on your hard drive. The pictures can then be viewed with any software you normally use to view pictures.
Note: If your FTP account requires you to use “passive mode” then you should have passive mode selected in FlyingHouse General Options, and you must also configure Internet Explorer (or other FTP client) to passive FTP mode. To do this in Internet Explorer, from the Tools menu of Internet ExploreràInternet Options. On the Advanced Tab, scroll down to and check “Use Passive FTP (for firewall and DSL modem compatibility).”
![]()
For other FTP clients, please refer to the user manual or help for that particular FTP client.
Viewing Images in HTTP
If your FTP account is configured to allow you to browse folder contents in HTTP, you can also view your pictures in HTTP. Consult with your hosting service provider to make sure this is configured correctly to allow browsing. Using Internet Explorer or most web browsers, you can view a list of pictures by entering the address provided by your hosting service provider for viewing your webpages. For example: http://www.myftp.com.
Other FTP Options
Instead of using Internet Explorer, you can use almost any FTP client. Two good ones that we recommend are WSFTP Home by Ipswitch (http://wsftp.com/products/ws_ftp/home/index.asp), and Direct FTP by Coffee Cup Software (http://www.coffeecup.com/direct-ftp/). Both companies offer a free trial version.
Time-Lapse Photography
FlyingHouse takes pictures at intervals that you specify in Automatic Connection Settings, and you can view a time-lapse photography slideshow with most image viewing software applications. One we like is ACDSee by ACDSystems (http://www.acdsystems.com/). This software lets you view slideshows and create slideshows that you can share with family and friends. You can also find many such applications on most popular download sites. We recommend download.com and TUCOWS. Do a search for “slideshow.”
Advanced
Configuring FlyingHouse™ 2.0 and Your Computer to Run While You Are Away or in an Emergency Environment Where the Power and Network Connections May Fail
If you want to use FlyingHouse to take and upload pictures while you are away, these are the recommended steps. FlyingHouse was originally designed to monitor the home of CoolSoft, LLC’s founder during hurricane Frances in 2004, under the assumption that power would fail (as it did), and that the computer running FlyingHouse should continue running on battery power.
Please note that FlyingHouse can be used in everyday situations without the more complex configuration described in this section. The configuration described below assumes there will be a power and communications failure, and that you want FlyingHouse to continue running for as long as possible after the power fails and restart automatically when power and communications are restored. We recommend you setup and test your configuration before leaving. Don’t wait until the last minute.
Although this is the recommend configuration, you should be prepared to fine-tune the various items for your system, hardware and Internet connection. If you come up with your own configuration and want to share it with us, please send an email to support@coolsoftllc.com and we will consider it for inclusion on our website or in the next release of this manual.
IMPORTANT NOTE: FlyingHouse is a consumer desktop application. Although it can be considered reliable, it should not be used under any conditions in which the images you want to capture are mission critical. CoolSoft, LLC and Le Groupe MontrealSoft, Inc. are not liable for damages caused by failure of FlyingHouse if it used in a mission critical application.
IMPORTANT NOTE: If leave a computer behind under emergency conditions such as a hurricane, you should expect that there is a chance it will be damaged or destroyed. Do not do this with a computer that is mission critical to your needs. If you are expecting a flood, place the computer, webcam and UPS in a high place. It will minimize the risk of damage to your equipment, and if there is flooding, it will extend the period of time for FlyingHouse to upload pictures. CoolSoft, LLC and Le Groupe Montreal Soft, Inc. are not liable for any damages caused to equipment used in conjunction with FlyingHouse.
Power
Connect the computer you are using to run FlyingHouse to an UPS (Uninterruptible Power Supply). This will enable the computer and FlyingHouse to keep running in the event of a power failure.
Monitor
If you are using a desktop computer, make sure the monitor is turned off or not plugged into the UPS. This will give you a longer UPS battery life.
If you are using a notebook computer, set the power settings to turn the monitor off after a short time when running on battery. This will extend the battery life, and the length of time for the computer and FlyingHouse to function.
To access Power Options Properties, right click in any blank space on the desktop, and select Properties. The Display Properties dialog appears. Select the Screen Saver tab, and at the bottom of this tab click on the “Power” button.
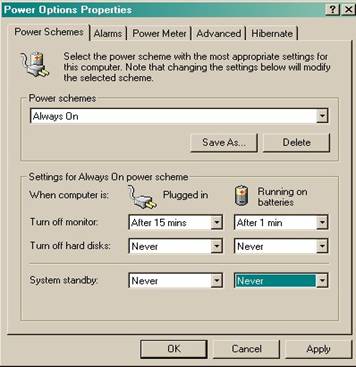
Recommended power settings for a notebook computer
running FlyingHouse when expecting a power failure.
Using a Notebook Computer (Recommended)
Using a notebook computer is preferred because it will maximize the amount of time that FlyingHouse can function. The UPS will keep the battery charged and once the power fails, it will drain the UPS battery much more slowly than with a desktop computer. Once both the power and UPS battery have failed, the battery in the notebook computer can keep going for many hours.
Network and Dialup Configurations
Configure and test network and dialup connections. The connection options for the dialup connection used by FlyingHouse should be configured as follows:
Network Connection
If you are expecting a power failure, a dialup connection is typically the most reliable, and in many locations telephone lines are still working long after power fails.
We recommend a high-speed network connection with a dialup connection as a backup, but you can simply rely solely on a dialup connection. If you are anticipating a power failure, dialup is the most reliable for long-term use.
If you do use a network connection, you might also want to plug your router and DSL/Cable modem into the UPS, although this will shorten battery life after the power fails. To maximize the battery life of your UPS, leave your router and DSL/Cable modem plugged into the wall.
If you have one available, you can also use a wireless device from a cellular service provider, such as a GPRS modem, but if the software that runs it connects by other than dialup, it must be able to connect automatically if an Internet connection is requested. Wireless connections are prone to being temporarily interrupted, and many of them require manual intervention to reconnect. But it may also be a useful to have a wireless network connection in the event that telephone service is interrupted.
Restarting FlyingHouseÔ2.0 When Power is Restored
To enable FlyingHouse to automatically restart when the power is restored, you must first configure three items. Follow the three steps below:
1. FlyingHouse must be configured to “Connect on startup” and “Start at Windows logon” in the FlyingHouse General Options tab.
2. Windows must be configured to start without having to input a user name and password.
In Windows 2000
To configure Windows to start without a user name and password, go to the control panel (StartàSettingsàControl Panel) and select Users and Passwords in the lower part of the Control Panel. Then follow the instructions under the Instructions section below.
 or
or

In Windows XP
Click Start, and then click Run. In the Open box, type “control userpasswords” and then click OK. Then follow the instructions under the User Accounts Window section below.
Note: In Windows XP Home Edition, when you right click and select “What is this?” the help information is not displayed in the User Accounts window, and you receive a dialog with the following error message: “Cannot find the Drive:\Windows\System32\users.hlp Help file. Check to see that the file exists on your hard disk drive. If it does not exist, you must reinstall it.” Click OK to ignore the error message.
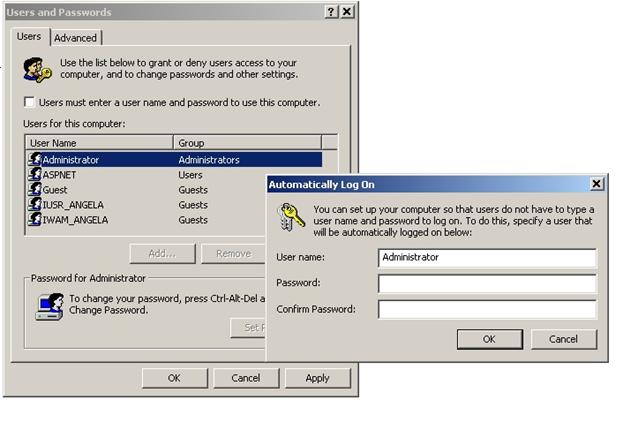
User Accounts Window
The “Users and Passwords” dialog will appear (see below). Select the User Name that you want to use when Windows starts automatically, then uncheck “Users must enter a user name and password to use this computer.”
Click on the Apply button and the “Automatically Log On” dialog appears (also shown below). Verify the User Name is the one you want to use (or enter the User Name under which you want Windows to start). Enter the password and retype the password in the confirm password box. Click on OK. From now on, Windows will start automatically with this user.
In the future, if after Windows starts, you want to logon as a different user, logoff (Start, click Shutdown, select Log Off “User Name” from the dropdown) then login with the desired user name and password.
3. Your computer must be configured to restart when power is restored.
This requires that the power settings in your computer’s BIOS to be configured so that will start when power is restored, or attempt to restart at specified times or time intervals. This is not an option on all computers, but is typically under the “Power” options, and typically, the BIOS gives you an option after an unexpected shutdown to resume the previous state (power on or off) when power is restored.
If you are not sure how to configure the BIOS on your computer, consult the user manual or contact technical support for your computer’s manufacturer.
The BIOS in most computers is typically accessed by pressing the “Delete” “F1” or “F2” key after you power on your computer, but you must press the correct key before Windows starts to load. Some computers use the “Esc” key. Again, this is information specific to your computer, so please refer to the user manual or technical support for your computer if you are having trouble accessing the BIOS.
WARNING: Changing the BIOS settings in your computer, if not done properly, can cause your computer to malfunction. CoolSoft, LLC and Le Groupe MontrealSoft, Inc. are not liable for damages that result from changing your BIOS settings.
Testing
You should setup, test and fine-tune this configuration well in advance of any emergency. We have learned from experience that it may take a few tries to get everything working correctly. Do not wait until the last minute, or your configuration may not work as expected, and you may not have time to fix it before leaving. This could result in FlyingHouse not being able to continue taking and sending pictures prematurely.
APPENDIX
CoolSoft, LLC Technical Support Policy
In order to keep the cost of our products low, CoolSoft, LLC provides technical support to registered users on a best efforts basis only. We will do our best to help you resolve your issue, but we cannot guaranty a solution.
FlyingHouse™ 2.0 does not use a registration key, and you are automatically registered when you buy your license for FlyingHouse™ 2.0 from CoolSoft, LLC. To access support, you need your order number and the email address that you used when you purchased your license - so be sure not to lose this information.
We cannot respond to requests for support on the following:
· How-to questions or technical issues that are covered in the Users Manual, Release Notes or in our FAQ’s. For example, a question where it is obvious that the user has not taken the time to read the manual, FAQ’s or other resources and follow the instructions.
· Issues related to third party hardware such as your network card, wireless card or webcam, or any problems caused by such hardware.
· Questions about your FTP or HTTP account that should be answered by your service provider.
· Questions from unregistered users who have not purchased a license.
· Questions from users of the trial version of FlyingHouse™ 2.0. To keep the cost of our products low, we cannot support trial users.
· Support questions by email. To get support, you need to submit your request through the convenient on-line form in the Support section of or website. You need your email address and order number to access this page.
· Requests for support that do not provide the required information.
Support on Third Party Software and FTP Accounts
We cannot support third party software such as the software that comes with your webcam, or your webcam itself. We cannot support your FTP account; this must be done by your service provider.
Windows Support
We cannot support issues with Windows. For Windows support, contact Microsoft at http://www.microsoft.com/support, or if your computer came with Windows installed, contact the manufacturer of your computer.
KNOWN ISSUES FOR FLYINGHOUSE™ 2.0, August 15, 2006 RELEASE
As of the August 15, 2006 release date, the following are known issues for FlyingHouse™ 2.0.
If you find other known issues, please send an email to support@coolsoftllc.com and give us a description of the problem and tell us how to recreate it.
Known Issues With FlyingHouse™ 2.0 and Recommended Workarounds:
The following are based on our experience in testing on our test machines. Actual results may vary widely depending on your computer.
We do not recommend unplugging your webcam while FlyingHouse is running. This may cause FlyingHouse or Windows to crash. This condition is caused by the drivers of some (not all) webcams. We have no control over the function (or lack of function) of drivers from third parties, and to avoid problems, we recommend not unplugging your webcam while FlyingHouse is running.
FlyingHouse is programmed to prompt the user and shut down if it is started when a webcam is not connected to the computer. However, as discussed above, some webcam drivers have flaws that will cause FlyingHouse to crash if it is started when the webcam supported by that driver is not plugged in. This has been documented with some Creative Lab webcams. If this happens with your webcam, don’t start FlyingHouse until the webcam is plugged in.
There is a known flaw in some Creative Labs webcam drivers that will cause FlyingHouse to crash if it is started without the associated Creative Labs webcam being plugged in. A side effect of this flaw is that once the Creative Labs driver is installed, FlyingHouse is prevented from starting even if another brand of webcam is installed and plugged into the computer. This is not a problem if you are using only one webcam (the Creative Labs webcam) as you need only make sure the webcam is plugged in before starting FlyingHouse, and it will function normally. This only becomes a problem if you have drivers for both the Creative Labs webcam and another brand of webcam installed on the same computer, and you try to use the other brand. You will be prevented from using the other brand of webcam until the driver for the Creative Labs is uninstalled. Uninstalling the Creative Labs webcam driver typically restores the functionality of the other brand(s) webcam.