
Making it FUN and EASY to use
SPEECH with your COMPUTER!
CoolSoft, LLC
SpeakToText 2.5 Speech Recognition
QUICK START GUIDE (Version 2.51)
Important Note:
This “Quick Start Guide” is intended for previous users of Microsoft speech recognition. For those new to the Microsoft speech recognition engine we recommend that you start with the SpeakToText™ 2.5 Users Manual.
SpeakToText Speech Recognition 2.5 - Key Features
· Basic Mode – Dictate and save text or copy it to Microsoft Word or other applications by way of the clipboard. The Copy to Word feature starts Word and copies text with a single speech command.
· Advanced Mode – Just tell SpeakToText to go into Advanced Mode, and you can dictate into almost any application that accepts text. And you can easily switch between applications just by placing the cursor in the program where you want your dictation to appear.
· Text-to-Speech – SpeakToText reads your dictation, documents and webpages to you with a simple speech command.
· User Commands – You can create your own speech commands to start programs, browse webpages, play videos, music and much more. You can even make your computer talk back to you. Just say the command you created and SpeakToText will run the command for you. You don’t even have to touch your mouse and keyboard.
· Send Message – This feature makes it easy to chat with all your friends hands free! You can create and send your message entirely by speech in MSN Messenger, AOL Instant Messenger, Yahoo Messenger, ICQ, PalTalk and Skype. You can even compose and send emails by speech in Outlook, Outlook Express, Netscape, Mozilla and many other email programs.
· Audio File Recognition – Create .wav files on your PC or personal recorder and convert them to text.
· Update Feature - Check for and install updates as we keep improving.
· Help Features - Speech enabled dialog boxes, tool tips and a “What Can I Say?” dialog make it easy for you to learn and remember speech commands. The Manual, Quick Start Guide and a “how to” video on setting up and training speech recognition are all easily accessible from the help menu.
· New – User Commands can now process commands that contain command syntax for other programs. For example, you can create your own speech commands to run modules in a home automation system such as the X10 Active Home Pro System.
© Copyright 2002-2006. CoolSoft, LLC – All rights reserved.
SpeakToText, CoolInfo and CoolSoft are trademarks and the sole and exclusive property of CoolSoft, LLC
SpeakToText 2.5, Version 2.51
Quick Start Guide
Table of Contents
Do You Already Have SAPI Speech Recognition Installed?
Setting Up and Training the Microsoft SAPI 5.1 Speech Recognition Engine
Setting Up and Configuring Your Microphone
Training the Microsoft SAPI Speech Recognition Engine
Listening and Microphone On-Off
Overview of SpeakToText Basic Terminology
Speech Recognition Engine Functionality
The SpeakToText Interface in Basic Mode
The SpeakToText Interface in Advanced Mode
Text to Speech (Read) Commands
Click Focus and Click Minimize Speech Commands
Using Speech with SpeakToText Message Dialogs
Converting Audio Files to Text
COOLSOFT, LLC TECHNICAL SUPPORT POLICY
SpeakToText™ 2.5 Speech Recognition (Version 2.51)
GETTING STARTED
System Requirements
System requirements for SpeakToText are:
|
Operating System: |
Windows 2000 or Windows XP (Home or Professional) with all the latest updates. This version of SpeakToText is not compatible with or supported in Windows Vista. |
|
Memory: |
At least 256 MB RAM, 512 MB or better preferred. |
|
System Processor: |
A PC with a 500mhz or greater, Pentium III, Pentium IV or Pentium compatible processor. |
|
Disk Space: |
100 MB free disk space. |
|
Software: |
Microsoft SAPI 5.1 Speech Recognition Engine* |
|
Hardware: |
A good quality, noise-cancellation microphone. A good quality, “SoundBlaster” compatible sound card. |
|
User: |
About 15 to 30 minutes of your time to install SpeakToText and the Microsoft SAPI 5.1 speech recognition engine* and train your recognition profile to recognize your voice. |
*Available by redistribution with SpeakToText or directly from Microsoft. Included with Office XP and Office 2003.
Installing SpeakToText
To install the program, simply double click on the installation file “SpeakToText2_0Install.exe” (or “SpeakToText2_0TrialInstall.exe” if you are installing the trial version), and follow the install screen instructions. If you are installing from the CD, insert the CD and from the main screen, click on “Install.” The install may take a long time, so please be patient. See the release notes for more details on the reasons for this.
What Do I Do Next?
After installing SpeakToText, there are a several things you need to do:
1) Create a personal speech recognition profile; 2) configure your microphone; and 3) train the speech recognition engine to recognize your voice. This is done from the Speech Properties dialog which is accessed from the Control Panel or the Speech Properties button in SpeakToText.
If you already had Microsoft SAPI 5.0 or greater installed on your computer and had already trained the speech engine before installing SpeakToText, it is not necessary to create a new personal speech profile. . However, you should check for and select the latest version of SAPI speech recognition. How to do this is explained in the following section.
Do You Already Have SAPI Speech Recognition Installed?
Before installing the trial version of SpeakToText, you should check if you have the latest Microsoft SAPI 5.1 compliant speech recognition engine installed on your computer.
If you have not previously installed the SAPI 5.1 speech recognition engine either directly from Microsoft or in conjunction with another SAPI 5.1 speech recognition program, the full version of SpeakToText will install it for you.
If you are using the trial version of SpeakToText, you must already have Microsoft speech recognition installed on your computer in order for the trial version to be speech enabled. Otherwise, you will only be able to see the full potential of SpeakToText using the buttons and menu items with your mouse and keyboard.
(Step 1) -- Check if you have the Microsoft speech recognition engine:
1.
Open the control panel (StartàSettingsàControl Panel).
Look for the Speech icon shown below. 
2. If you see the Speech icon, double click on it and you will see the Speech Properties dialog.
Note: If the Speech icon is not present, then you do not have the speech recognition engine on your computer and you can skip the rest of this section.
(Step 2) -- Check the version of the Microsoft speech recognition engine:
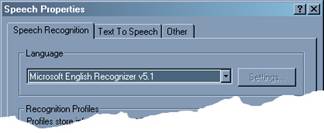
If the version of the Microsoft speech recognition engine is “Microsoft English Recognizer v5.0, v5.1 or v6.1” as shown in the “Language” section of the Speech Properties dialog, then you already have one of the correct versions of the Microsoft SAPI speech recognition engine, and you should select the highest version as the default.
NOTE: THERE IS A DIFFERENCE BETWEEN THE ENGLISH RECOGNIZER v5.0 THAT COMES WITH OFFICE XP, ENGLISH RECOGNIZER v5.1 THAT COMES WITH SpeakToText, AND ENGLISH RECOGNIZER v6.1 THAT COMES WITH OFFICE 2003. SpeakToText FUNCTIONS WITH ALL THREE OF THE ABOVE REFERENCED VERSIONS OF SAPI, AND YOU CAN SWITCH VERSIONS WITHOUT HAVING TO RETRAIN YOUR SPEECH RECOGNITION PROFILE. USING THE MOST RECENT VERSION OF SAPI WILL GIVE YOU THE BEST PERFORMANCE. ACCORDINGLY, IF YOU HAVE ENGLISH RECOGNIZER v5.0, YOU SHOULD SWITCH TO THE v5.1 THAT COMES WITH SpeakToText. IF YOU HAVE IT, THE ENGLISH RECOGNIZER v6.1, WHICH IS INCLUDED WITH MS OFFICE 2003 IS PREFERABLE TO THE ENGLISH RECOGNIZER v5.1 THAT IS INSTALLED WITH SpeakToText.
Note: If you access the Speech Properties dialog from SpeakToText and change the version of SAPI, SpeakToText needs to be closed and restarted in order for the changes to take effect.
Setting Up and Training the Microsoft SAPI 5.1 Speech Recognition Engine
Start “Speech Properties”
Go to the Windows Control Panel (StartàSettingsàControl Panel).
Find and double click the “Speech” icon. To edit these settings after
SpeakToText is installed, within SpeakToText, click on the Speech Properties
button, or say “train speech profile” or “configure microphone.” You can also
say “click speech properties.”
The “Speech Properties” dialog appears:
Setup your Recognition Profile
We recommend not using the “Default Speech Profile,” but rather creating a new speech recognition profile with a unique name – especially if there will be others using speech with this computer. To create a new profile, click on “New…” and follow the prompts.
After creating your new profile, click “Next” to configure your microphone and train your profile (do not click “finish”). The next two sections are extremely important in achieving good speech recognition and the highest possible level of accuracy.
Setting Up and Configuring Your Microphone
Microphone Quality
In selecting the correct microphone headset, consider: 1) Sound in the environment (a noise canceling microphone is required) and 2) Fit and style (Will you be comfortable?). Cost is usually not a factor. A less expensive microphone may fit your needs better than a more costly one. There are many suppliers of high quality speech recognition microphones. Please check our website where you can purchase a variety of recommended headset microphones.
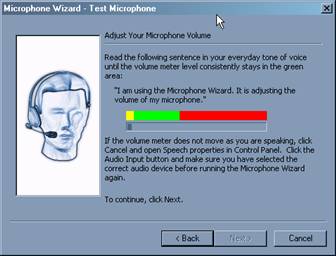
Configure the Microphone
To achieve the best speech recognition accuracy, we recommend configuring your microphone each time before beginning a speech recognition session. This can be done easily from SpeakToText by saying “Configure Microphone,” which opens the Speech Properties dialog where you can do this.
Select Audio Input
The “Audio Input” should be set to your system’s default audio device. If your system has more than one sound card, you can use this button to select a new audio input device. If you are not sure which is the correct device, please see the user manual for your computer or contact technical support for the manufacturer of your computer.
Training the Microsoft SAPI Speech Recognition Engine
You can access
the Speech Properties dialog from SpeakToText by clicking on the Speech
Properties button ![]() or saying “train speech
profile.”
or saying “train speech
profile.”
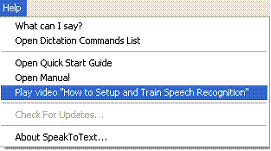
The installation of SpeakToText now includes a short and informative video on setting up and training a speech recognition profile for the Microsoft SAPI speech recognition engine. This video can be accessed from the SpeakToText Help Menu or from the Windows Program menu by clicking Start buttonàProgramsàSpeakToTextàPlay video “How to Setup and Train SAPI Speech Recognition” as shown below.
![]()
Training Overview
Although the Microsoft Speech Recognition Engine is much better than previous speech engines, it still needs a sample of each user’s speech to correctly convert sound into written words. Each speaker and each computer audio system has unique characteristics, which must be sampled and used to adjust the engine. This process is called “training.”
Each user must setup and train their own individual speech recognition profile. The initial setup and training of your speech recognition profile typically takes less than 15 minutes. During this process, speak in a normal and even tone of voice and insure that the microphone is properly configured and positioned about one inch from your mouth.
Start Training
To start training, click on the “Train Profile” button from the Speech Recognition tab and follow the instructions. When you first establish your profile, the training session reading excerpt is chosen for you. If this is not the first time you have trained this profile, you will be given a choice of literature to read aloud to your computer for training.
Select a title and click on “Next>.” Read the selection and follow the instructions to complete your training session.
Note: If it has been some time since the initial training of your profile, we recommend using the “Introduction to Microsoft Speech Recognition” session to re-familiarize yourself with how training works.
If you want to take a break, click on the “Pause” button. Training will be paused and the “Pause” button will change to “Resume.” When you are ready to start reading again, click the “Resume” button.
As you complete each reading excerpt, you will have the option to select “Finish” or “More Training.”
IMPORTANT: Speech recognition accuracy will improve with additional training of the Speech Recognition Engine.
Training Words
If the speech recognition engine consistently fails to recognize your pronunciation of certain words, you can train the Microsoft Speech Recognition Engine to recognize how you say that particular word by using the “Train Word” feature. To open the Train Word dialog, use the “click train word” voice command or click on <Tools> <Train Word> in the SpeakToText menu.
Tips for Achieving the Best Possible Speech Recognition
· Use a high quality, noise-canceling microphone. Also, make sure your microphone is setup properly in “Speech Properties.”
· Train the speech engine to recognize your voice at least several times. More training greatly improves speech recognition.
· If you consistently get incorrect recognition of certain words, use the “Train Word” function in SpeakToText to enhance recognition of problem words.
· The more speech recognition is used on your computer, the more your speech recognition accuracy will improve.
· Using speech recognition in a quiet environment improves speech recognition accuracy.
· Faster computer processors and ample memory (256k sufficient, 512k or more is desirable) enables the speech engine to process speech more quickly and efficiently. A high quality, SoundBlaster compatible, input sound card is also an important factor to good recognition.
· Users must initially invest the necessary time to set-up and train their own speech recognition profile. We cannot over-emphasize the importance of training your speech recognition profile.
· When using SpeakToText, speak clearly into the microphone. Make certain your microphone position is consistent both in training and in use. We recommend the microphone be placed about one inch from your mouth.
Technical Support on the Microsoft SAPI Speech Recognition Engine
The redistribution of the SAPI 5.1 speech recognition engine, together with SAPI 5.0 and 6.1 available in Microsoft Office products, are Microsoft products that we cannot support. The Microsoft speech recognition engine is designed to enable you to use speech recognition with certain Microsoft programs and other third party software, like SpeakToText, and in most cases should not require technical support. However, if you do need technical support on issues with the Microsoft SAPI speech recognition engine go to the speech section of the Microsoft website – http://www.microsoft.com/speech. You can also contact Microsoft technical support.
USING SpeakToText BASICS
Starting SpeakToText
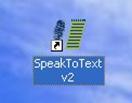
To start SpeakToText, either click the SpeakToText icon on your desktop or use the Windows Program menu (StartàProgramsàSpeakToText).
![]()
Trial versions and unregistered versions of SpeakToText cause the SpeakToText trial startup dialog to open before the program starts. SpeakToText will also display three banner ads when running in trial mode: one in the startup dialog, a second when the program is launching and a third in the program window. The trial and unregistered versions of SpeakToText have some functionality limitations. These are explained under “Trial Version Limitations,” below.
Program registration will eliminate the trial startup dialog and banners from appearing when you launch SpeakToText, and the trial version limitations are removed.
Listening and Microphone On-Off
The default settings when SpeakToText starts are “microphone on” and “listening off.” Essentially, SpeakToText is muted to prevent SpeakToText from recognizing background noise and conversations until you are ready to dictate. To activate listening, say “start listening” or “wake up.” To turn off listening, say “stop listening” or “go to sleep.” You can also use the start/stop listening buttons. The Stop/Start Listening buttons are shown below.
![]()
![]()
Listening Off Listening On
Stop Listening Button Depressed Stop Listening Button Raised
Start Listening Button Raised Start Listening Button Depressed
Note: Some users may notice that the Start/Stop listening commands act to toggle the listening mode. With some speech recognition profiles, the speech recognition engine misrecognizes these commands, and this effect can vary between users and systems. For this reason, we created the alternative “wake up” and “go to sleep” speech commands, which perform the same functions.
To turn the microphone off: Say “microphone off” or click the microphone button.
![]()
![]()
Microphone On Microphone Off
Button Depressed Button Raised
Important Notes On Using the Microphone:
Once the microphone is turned off, you will need to click on the microphone button to turn it back on (it cannot hear you when it is turned off). However, you can toggle between listening on/off with speech. We also recommend that you “stop listening” or turn the microphone off when you are not using SpeakToText. For example, answering the phone or engaging in conversation with a co-worker with SpeakToText listening is comparable to leaning on the keyboard, and will produce similar results.
SpeakToText may be started with “listening on.”
Click the “General” tab under SpeakToText “Settings.” To get to SpeakToText Settings,
say “click settings” or click on the
”settings” button.
Overview of SpeakToText Basic Terminology
Before using SpeakToText, read this section to become familiar with the terminology used by the program. The main purpose of SpeakToText is to use speech recognition to input text by speech into SpeakToText or into other applications. When SpeakToText is being used with another application, that application is referred to as the Target Application. SpeakToText works with the Microsoft speech recognition engine. When you speak, your speech is processed by the speech recognition engine, which sends the recognized text to SpeakToText, and when in Advanced Mode, into a Target Application.
Advanced Mode
When using SpeakToText in Advanced Mode, the dictation area of SpeakToText will close and the dictated text will appear in the Target Application where you have placed the cursor. The cursor must be placed in the Target Application in the same location as you would place it if you were typing (at the insertion point). It is not sufficient to just click on the Target Application. Once in Advanced Mode, you can minimize SpeakToText to the taskbar if desired. Use the “click minimize” speech command to minimize SpeakToText, and the “click focus” speech command to bring it back.

Target Application
In Advanced Mode, this is the application where you have placed the cursor. In order for SpeakToText to work in Advanced Mode, the area of the application where you have placed the cursor must be able to accept input from the keyboard. Just use your mouse to click where you would normally type.
Phrase or Utterance
A phrase or utterance is a string of text recognized by the speech recognition engine. If you speak a short phrase or sentence, it will usually be recognized as a single phrase. If you speak a long sentence or paragraph, it may be recognized as multiple phrases, which may or may not be complete sentences. Accordingly, commands such as “Scratch Last” may not always act on the entire block of text you have dictated.
Speech Recognition Engine Functionality
Sharing the SAPI Speech Recognition Engine
SpeakToText needs exclusive use of the Microsoft SAPI speech recognition engine. It should be the only speech recognition application running. However, SpeakToText is now designed to manage sharing of the SAPI speech recognition engine with future releases of CoolSoft speech recognition applications.
Getting Ahead of the Speech Engine – Clearing the Speech Buffer
If you are dictating and the speech recognition accuracy or speed begin to deteriorate, try pausing for a short while to allow the speech engine to “catch up.” If pausing does not improve recognition, try clearing the speech buffer by clicking on the “clear speech buffer” icon, pressing the escape “Esc” key (SpeakToText must have the active focus if you are using the “Esc” key, otherwise the application with the active focus will receive the command from the “Esc” key.), or by using the menu (EditàClear Speech Buffer). Note that the speech buffer cannot be cleared by a speech command. Also, once you clear the speech buffer, you should stop speaking and wait for the microphone to turn itself off. After the microphone turns off, you can turn it back on and start using SpeakToText again.
Speech Recognition Accuracy
The accuracy of speech recognition generally improves each time you train the speech recognition engine. Time invested in training is well worth the return in improved recognition accuracy. While training the speech engine and using SpeakToText, it is important that you are in a quiet environment with minimal background noise. Always speak clearly into a good quality headset microphone and configure your microphone each time before starting. Remembering these points will help you achieve the most accurate possible speech recognition for your given system and environment.
Supported Target Applications
SpeakToText is designed to work with most applications that can accept text or send messages. However, SpeakToText has been tested with and is supported with the following applications:
Word Processing Applications
Microsoft Word 2000, XP and 2003
Microsoft Wordpad
Microsoft Notepad
Windows Clipboard
Microsoft Internet Explorer – Webmail application text boxes
Open Office 1.1.3
EMail and Web Browsers (Compose Message and Browser with Webmail application text boxes)
Internet Explorer
Netscape 7.x
Mozilla
FireFox/Thunderbird
Microsoft Outlook (Office 2000, XP and 2003)
Microsoft Outlook Express Versions 5 and 6)
Chat Programs
MSN Messenger
AOL Instant Messenger
Yahoo Messenger
ICQ
PalTalk
Skype
SpeakToText OVERVIEW
The SpeakToText Interface in Basic Mode
This is what you’ll see when SpeakToText opens. In the graphic below, we have labeled the buttons and included their corresponding speech commands:
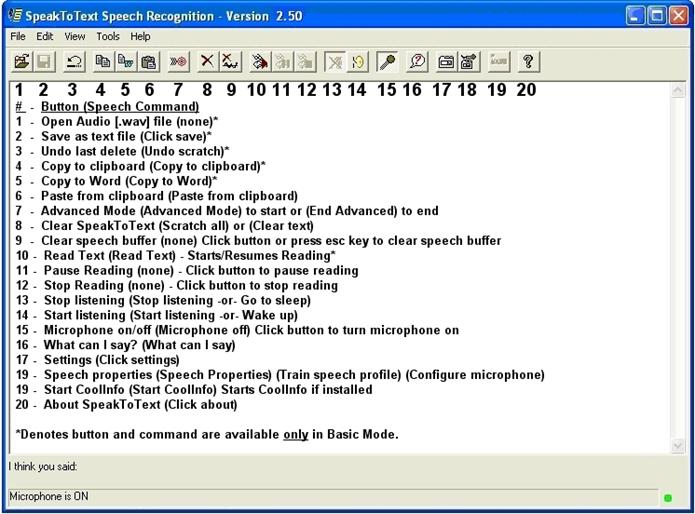
Language and Status Bars
There are two message bars at the bottom of SpeakToText: the “Language Bar” and the “Status Bar”.

“Language Bar”
The Language Bar is located at the bottom of the SpeakToText window (it is the top line where “I think you said:” appears). When you speak into the microphone, this is the first place where commands and recognized text appear. It will be preceded by the words “I think you said:” Note that the Language Bar will often not display the text you spoke, or the text that is displayed will change as the speech recognition engine analyzes your speech. This is normal, and typically the correct text will eventually be recognized. Words may change as the speech recognition engine and SpeakToText are doing their work. Sometimes the correct word will be displayed and then will change to another word. This may be frustrating, but it is an inherent flaw in the statistical models that speech recognition engines use to help them guess the correct word, and this is beyond the control of SpeakToText itself. While the correct word may have been recognized, the statistical model has given greater weight to another probable word. Essentially, the speech engine has “guessed” incorrectly. Current speech recognition technology, though highly accurate most of the time, is still far from perfect.
“Status Bar”
The Status Bar is located on the bottom of the SpeakToText window, below the Language Bar. It is the bottom line where “Microphone is ON” initially appears. This is where the current status of SpeakToText is shown. Typically, it displays the last command that was processed.
“Speech Recognition Engine Status Indicator”
At the far right of the status bar is the SAPI Speech Recognition Status Indicator light. This indicator is green when the Microphone is on and SpeakToText has exclusive control of the SAPI speech recognition engine. When the Microphone is turned off or another speech application has exclusive control of the SAPI speech recognition engine, this indicator is red.
The SpeakToText Interface in Advanced Mode
The following shows SpeakToText in Advanced Mode. To enter Advanced Mode, say “Advanced Mode” and SpeakToText will switch to the following view.

SpeakToText shown in Advanced Mode
![]()
SpeakToText shown in the system tray in Advanced Mode
Starting with Version 2.50, SpeakToText has a system tray icon and system tray right click menu. The system tray is located in the lower right corner of your desktop to the left of the clock.
Send Message Speech Command
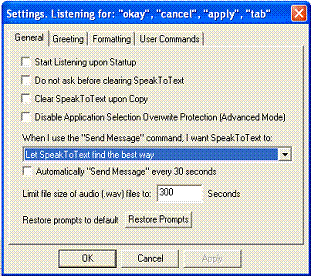
When SpeakToText is in Advanced Mode, and the target application is a chat or email program, when you say “send message” SpeakToText delivers a “send command” to the target application to send your message. This enables you to dictate and send chat messages and email without using your mouse and keyboard. An “Automatically Send Message every 30 seconds” feature is available starting with Version 2.50. This feature is particularly useful for sending a transcript of voice chat sessions.
Internet Security
When using the update feature (available only in the full registered version), SpeakToText needs to be able to access the Internet to check and retrieve any available updates. Internet security and firewall programs on your computer or network must be configured to allow SpeakToText to access the Internet.
Refer to the SpeakToText 2.0 User Manual
for detailed explanation of all the programs features.
Controlling SpeakToText
SpeakToText has two types of commands: “Command and Control Commands” and “Dictation Commands.” There are three means to use commands in SpeakToText:
· Speech Commands
· Buttons
· Tool Bar Menu Items
The main program functions can be controlled by all three of the above means. Less important functions or functions related to dictation are controlled from the Menu and Speech Commands. Some commands, like Dictation Commands or commands intended to be used only with speech, are available only by speech. The following gives an overview of each of type of command.
Text to Speech (Read) Commands
SpeakToText can read text that is displayed in the SpeakToText dictation area or text that you have copied to the clipboard. There are five read options and corresponding speech commands, and three read buttons. The first three , “Read All,” “Read Right,” and “Read Selection” apply only to SpeakToText in Basic Mode. “Read Clipboard” is available from both modes, and “Read Target” is available only from Advanced mode.
User Commands
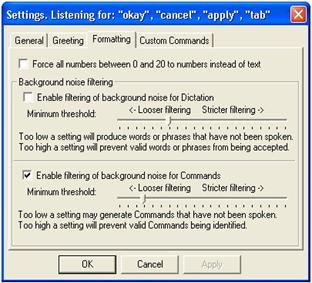
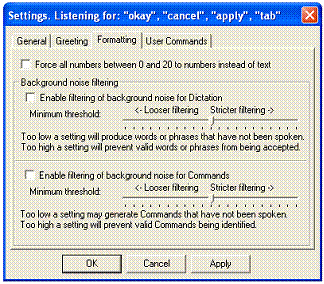
With SpeakToText you can create your own speech commands from the User Commands tab in the Settings dialog. Just go to this tab and follow the instructions. The “Enable these Commands” checkbox must be checked in order for User Commands to function.
Starting with SpeakToText Version 2.51, User Commands can process commands that contain command syntax for an application. The vertical slash "|" is used to separate the application path and the command syntax. Typically, any “Application Path|Command Syntax” combination that runs from the command line, will also run in User Commands by speech.
User Command Examples
Here are four examples of User Commands that you can create (one for each action). See the SpeakToText User Manual for a complete overview of creating, editing and using User Commands.
|
Command |
Action |
Target |
Result (what the computer will do) |
|
Computer |
Speak |
What do you want |
The computer will speak the words "what do you want." |
|
Start Internet Explorer |
Run |
C:\Program Files\Internet Explorer\Messenger\iexplore.exe |
The computer will start Internet Explorer. |
|
Start Internet Explorer (Advanced) |
Run |
Iexplore |
The computer will start Internet Explorer. |
|
Go to homepage |
Browse |
www.myhomepage.com or http://www.myhompeage.com |
The computer will open www.myhomepage.com in the default web browser. |
|
Play my favorite song |
Open |
c:\My Documents\My Music\MyFavoriteSong.mp3 |
The computer will play MyFavoriteSong.mp3. |
Click Focus and Click Minimize Speech Commands
If SpeakToText disappears behind another window, saying “click focus” will bring SpeakToText to the foreground with an active focus. To minimize SpeakToText, you can use the “Click Minimize” speech command, and SpeakToText will minimize to the taskbar.
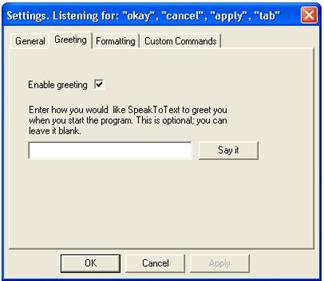
Using Speech with SpeakToText Message Dialogs
Most of the SpeakToText message dialogs are speech enabled. A speech enabled dialog will have the message at the top “SpeakToText is listening for ….” and will list the words that correspond to the message dialog buttons. Typically these commands include “yes,” “no,” “okay,” “cancel,” “apply” or “check” depending on the nature of the message dialog.
Converting Audio Files to Text
SpeakToText can recognize audio files that you create on your computer or personal recorder, and covert them to text for you. Just drag and drop a .wav file into SpeakToText. The microphone must be turned on to use this feature.
CoolInfo
CoolInfo is a sponsored program that lets you retrieve information from the Internet by speech, and will become available on the CoolSoft website in the fall of 2006. If CoolInfo is installed on your computer and has been started once, it can be started from SpeakToText. Just say “Start CoolInfo” or click on the “Start CoolInfo” button.
Help Features
Tool Tips
Convenient tool tips appear when you place the pointer over a button, indicating the Speech Commands for that button.
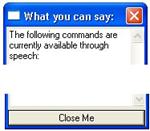
What Can I Say?
The “What Can I Say?” feature opens a window that lists the speech commands that are active at that particular point in the program. To open this window, either say “what can I say,” click on the “What Can I Say?" button or select “What Can I Say?” from the Help Menu. To close the “What Can I Say?” window, say “close me” or click on the “Close Me” button at the bottom of the “What Can I Say?” window.
What Can I Say?
Button ![]() Close
Me Button
Close
Me Button ![]()
Note: The commands displayed in the “What Can I Say?” window will vary depending on which commands are active at that point in SpeakToText.
Note: If you enable and create User Commands, these will also appear in the What Can I Say? dialog.
Manual and Quick Start Guide
Both the Manual and Quick Start Guide can be accessed from the Help Menu. You can also say “open manual” or “open quick start.”
How To Setup and Train Speech Recognition Video
SpeakToText includes a brief and informative video on setting up and training a speech recognition profile for the Microsoft SAPI speech recognition. This video can be accessed from the SpeakToText Help Menu, or from Windows in the SpeakToText program group by clicking Startà Programs àSpeakToText àHow to Setup and Train SAPI Speech Recognition.
Dictation Commands
To view a list of SAPI and SpeakToText Dictation Commands: From the help menu, select “Open Dictation Commands list” or say “open dictation commands.” This will open a new window in your web browser and display a list of available Dictation Commands.
Message Dialog Prompts
SpeakToText includes message dialogs to prompt or advise you at key points throughout the program. These dialogs have important messages about using SpeakToText and are intended to help you learn how to best use SpeakToText quickly. Many of these dialog have a checkbox so you can choose not to display them again as you become proficient with using SpeakToText.
COOLSOFT, LLC TECHNICAL SUPPORT POLICY
In order to keep the cost of our products low, CoolSoft, LLC provides technical support to registered users on a best efforts basis only. We will do our best to help you resolve your issue, but we cannot guaranty a solution.
We cannot respond to requests for support on the following:
· How-to questions or technical issues that are covered in the Users Manual, Release Notes or in our FAQ’s. For example, a question where it is obvious that the user has not taken the time to read the manual, FAQ’s or other resources and follow the instructions.
· Issues related to the Microsoft speech recognition engine, or issues with SpeakToText that are caused by the Microsoft speech recognition engine.
· Issues related to third party programs such as chat or email programs or problems with SpeakToText™ 2.0 caused by those programs.
· Questions from unregistered users who have not purchased a registration key. To keep the cost of our products low, we cannot support trial users. To get support, you need to provide your email address and either your order number or a valid registration key for one of our products, and submit your request through the convenient on-line form in the Support section of or website.
· Requests for support that do not provide the required information.
Support with the Microsoft Speech Recognition Engine
If you need help with the Microsoft Speech Recognition Engine or issues caused by the Microsoft engine, you can use the help resources in the Speech Properties dialog under the “Help” tab, (Startà Settingsà Control Panelà Speechà Other Tabà Help). You can also visit the speech section of the Microsoft website at http://www.microsoft.com/speech or you can contact Microsoft technical support directly.
Support on Third Party Software
If you need support with another program or issues caused by another program, use the help feature in that program, or contact the manufacturer’s technical support directly.

QUICK REFERENCE GUIDE
SpeakToText™ 2.5 Speech Recognition (Version 2.51)
©Copyright 2002-2006 – CoolSoft, LLC – All rights reserved.
When you first start using SpeakToText, we recommend that you print a copy of the following pages and keep them available as a handy reference.
SpeakToText 2.5 - Interface in Basic Mode – Buttons and Speech Commands

SpeakToText 2.5 - Interface in Advanced Mode

SpeakToText 2.5 - Settings Dialog Tabs
![]()
Settings Button Speech Command: Click Settings
SpeakToText 2.5 - Dictation Speech Commands
Moving Within Dictated Text (not available in Advanced Mode)
Command – What To Say: RESULT:
Go to Bottom Moves the cursor to the end of your document.
Go to End Moves the cursor to the end of your document.
Go to Top Moves the cursor to the beginning of your
document.
Go to Beginning Moves the cursor to the beginning of your
document.
Formatting Text (not available in Advanced Mode)
Command – What To Say: RESULT:
New Paragraph Presses enter key twice.
New Line Presses enter key once.
Backspace Presses the backspace key once.
Space Bar Presses space bar once.
Cap Text Capitalizes the first letter of each word in the selected (highlighted) text.
Cap All Text Capitalizes all the letters of the selected (highlighted) text.
Caps Lock Toggles the “caps lock.” Say “caps lock” to engage caps lock, and say “caps lock” again to disengage.
Numbers and Fractions
Number: What To Say:
Three three (the speech engine default for single numerals between zero and twenty always typed as text by the Microsoft speech engine)
“3” “Force Num (pause) three” – will return the numeral 3.
“34” thirty four OR three four
“153” one fifty three, one five three, one hundred fifty three OR one hundred and fifty three
”6091” six eight nine one
6891 six thousand eight hundred ninety one OR six thousand eight hundred and ninety one (See Note below)
6,891.525 six thousand eight hundred ninety one point (decimal) five two five OR six thousand eight hundred and ninety one point (decimal) five two five
15,451 fifteen thousand four hundred fifty one OR fifteen thousand four hundred and fifty one
183,012 one hundred eighty three thousand twelve OR one hundred eighty three thousand and twelve
$75 dollar sign seventy five (saying dollar sign before the number returns the dollar amount without cents)
$75.00 seventy five dollars
$19.95 nineteen dollars and ninety five cents
½ one half
2 1/4 two and one quarter
5/8 five eights, five slash eight OR five over eight
150/85 one fifty over eighty five
Dates and Times
Result: What To Say:
November 3, 1981 November three comma nineteen eighty one
November 03, 1981 November three nineteen eighty one OR three November nineteen eighty one (omitting the comma returns a two digit date)
24 April, 1959 twenty four April comma nineteen fifty nine
04/24/59 zero four slash twenty four slash fifty nine
24/04/59 twenty four slash zero four slash fifty nine
4:16 PM ** four sixteen p m (See Note below)
5:00 five o’clock (works with whole hours only)
Phone Numbers and Email/URL Addresses
Result: What To Say:
(954)-555-7700 nine five four five five five seven seven zero zero
1-(800)-555-1212 one eight hundred five five five one two one two
.com dot com
.net dot net
.org dot org
Punctuation Marks
Result: What To Say:
. period/dot
. point (say when using numbers)
; semicolon
, comma
- hyphen
? question mark
-- double dash (note – saying “dash” also returns “- -“)
! exclamation point/exclamation mark
… ellipsis
: colon
’ apostrophe
/ slash
\ back slash
“ quote/open quote
” quote/end quote/close quote
‘ single quote/open single quote
’ single quote/end single quote/close single quote
( left paren/open paren
) right paren/close paren
[ left bracket/open bracket
] right bracket/close bracket
< left angle/open angle/less than
> right angle/close angle/greater than
{ open brace/left brace
} close brace/right brace
@ at sign
# pound sign
- hyphen (use for minus sign)
+ plus sign
$ dollar sign
= equal sign
% percent sign
^ caret (note if this returns the word “carrot” emphasize the “a” in your pronunciation(kAy-ret)
& ampersand
_ underscore
* asterisk
| vertical bar
SpeakToText 2.5 - Speech Commands – Basic Mode
(If you enable and create User Commands, these will also appear in the What Can I Say? dialog)
|
Advanced Mode |
Starts Advanced Mode |
|
Backspace |
Moves the Cursor Back One Space |
|
Cap All Text |
Capitalizes All Letters in Selected (Highlighted) Text |
|
Cap Text |
Capitalizes The First Letter of Each Word in Selected (Highlighted) Text |
|
Caps Lock |
Turns Caps Lock On/Off |
|
Clear Text |
Clears SpeakToText or Deletes Selected (Highlighted) Text |
|
Clear Word |
Deletes the Last Word Spoken |
|
Click About |
Opens the About Dialog |
|
Click Exit |
Closes SpeakToText |
|
Click Focus |
Brings SpeakToText to the Foreground |
|
Click Minimize |
Minimizes SpeakToText |
|
Click Save |
Saves the Contents of SpeakToText |
|
Click Settings |
Opens the Settings Dialog |
|
Close me |
Closes the What Can I Say? Dialog |
|
Configure Microphone |
Opens The Speech Properties Dialog |
|
Copy to Clipboard |
Copies the Contents of SpeakToText to the Clipboard |
|
Copy to Word |
Copies the Contents of SpeakToText to Microsoft Word |
|
Delete Selection |
Deletes the Selected (Highlighted) Text |
|
Force Num |
Forces the Next Number Between 1 and 20 to Numeric |
|
Go To Beginning |
Moves the Cursor to the Beginning of Text |
|
Go To Bottom |
Moves the Cursor to the End of Text |
|
Go To Sleep |
Stops Listening (Mutes SpeakToText) |
|
Go To Top |
Moves the Cursor to the Beginning of Text |
|
Go to End |
Moves the Cursor to the End of Text |
|
Microphone Off |
Turns the Microphone Off |
|
No no |
Deletes the Last String of Spoken Text |
|
Open Dictation Commands |
Displays a List of Dictation Commands in the Default Browser |
|
Open Manual |
Displays the Manual in the Default Browser |
|
Open Quick Start |
Displays the Quick Start Guide in the Default Browser |
|
Paste from Clipboard |
Pastes the Contents of the Clipboard into the Target Application |
|
Read Clipboard |
Reads the Contents of the Clipboard |
|
Read Right |
Reads the Text From the Right of the Cursor to the End |
|
Read Selection |
Reads the Selected (Highlighted) Text |
|
Read Text |
Reads All the Text in SpeakToText |
|
Scratch All |
Clears SpeakToText or Deletes Selected (Highlighted) Text |
|
Scratch Last |
Deletes the Last String of Spoken Text |
|
Scratch Paragraph |
Deletes the Last Paragraph |
|
Scratch Phrase |
Deletes the Last String of Spoken Text |
|
Scratch Sentence |
Deletes the Last Sentence |
|
Scratch Word |
Deletes the Last Word Spoken |
|
Scroll Down |
Scrolls up SpeakToText in Basic Mode, and What Can I Say? when open |
|
Scroll Up |
Scrolls down SpeakToText in Basic Mode, and What Can I Say? when open |
|
Select All |
Selects (Highlights) All Text in SpeakToText |
|
Select Last |
Selects (Highlights) the Last String of Spoken Text |
|
Select Paragraph |
Selects (Highlights) the Last Paragraph |
|
Select Phrase |
Selects (Highlights) the Last String of Spoken Text |
|
Select Sentence |
Selects (Highlights) the Last Sentence |
|
Select Word |
Selects (Highlights) the Last Word |
|
Space Bar |
Enters One Space |
|
Speech Properties |
Opens the Speech Properties Dialog |
|
Start CoolInfo |
If CoolInfo is installed, starts CoolInfo, or if running gives it focus |
|
Stop Listening |
Stops Listening (Mutes SpeakToText) |
|
Tab Key |
Inserts a "tab" character |
|
Train Speech Profile |
Opens the Speech Properties Dialog |
|
Train Word |
Opens the Train Word Dialog |
|
Undo Scratch |
Undoes the last scratch if no new text has been entered |
|
What Can I Say |
Opens the What Can I Say? Dialog |
SpeakToText 2.5 - Speech Commands – Advanced Mode
|
Caps Lock |
Turns Caps Lock On/Off |
|
Click About |
Opens the About Dialog |
|
Click Exit |
Closes SpeakToText |
|
Click Focus |
Brings SpeakToText to the Foreground |
|
Click Minimize |
Minimizes SpeakToText |
|
Click Settings |
Opens the Settings Dialog |
|
Close me |
Closes the What Can I Say? Dialog |
|
Configure Microphone |
Opens The Speech Properties Dialog |
|
Copy Target |
Copies the Contents of the Target Application to the Clipboard |
|
End Advanced |
Returns SpeakToText to Basic Mode |
|
Force Num |
Forces the Next Number Between 1 and 20 to Numeric |
|
Go To Sleep |
Stops Listening (Mutes SpeakToText) |
|
Microphone Off |
Turns the Microphone Off |
|
Open Dictation Commands |
Display a List of Dictation Commands in the Default Browser |
|
Open Manual |
Displays the Manual in the Default Browser |
|
Open Quick Start |
Displays the Quick Start Guide in the Default Browser |
|
Paste from Clipboard |
Pastes the Contents of the Clipboard into the Target Application |
|
Read Clipboard |
Reads the Contents of the Clipboard |
|
Read Target |
Reads the Contents of the Target Application |
|
Scroll Down |
Scrolls Down in the What Can I Say? dialog |
|
Scroll Up |
Scrolls Up in the What Can I Say? dialog |
|
Send Message |
Sends the Message in Supported Chat and Email Programs |
|
Speech Properties |
Opens the Speech Properties Dialog |
|
Start CoolInfo |
If CoolInfo is installed, starts CoolInfo, or if running gives it focus |
|
Stop Listening |
Stops Listening (Mutes SpeakToText) |
|
Tab Key |
Inserts a "tab" character |
|
Train Speech Profile |
Opens the Speech Properties Dialog |
|
Train Word |
Opens the Train Word Dialog |
|
What Can I Say |
Opens the What Can I Say Dialog |
SpeakToText 2.5 Commands – Microphone On and Listening Off
|
Click Focus |
Brings SpeakToText to the Foreground |
|
Close me |
Closes the What Can I Say? Dialog |
|
Start Listening |
Turns Listening On (Un-mutes SpeakToText) |
|
Wake Up |
Turns Listening On (Un-mutes SpeakToText) |
|
What Can I Say |
Opens the What Can I Say? Dialog |
What Can I Say?
What Can I Say?
Button ![]() Close
Me Button
Close
Me Button ![]()
Speech Command: “What Can I Say”
Note: The commands shown above lists appear in the What Can I Say? dialog depending on the SpeakToText mode. If you enable and create User Commands, these will also appear in the What Can I Say? dialog in both Basic and Advanced modes. Move the cursor over a command in the What Can I Say? dialog to see a tool tip for that command.